WordPress is a great platform for hosting a blog but it isn’t the best platform when it comes to security. There are many vulnerabilities that are constantly being found and exploited in both WordPress and it’s thousands of plug-ins. I’ve been stung by malicious attacks in the past by hackers that injected malicious rows in my MySQL tables. edited my WordPress files or created malicious PHP files that would do things like display spam links at the top of my blog. Recovering from these is not easy, it took me hours to identify the infected files/tables and clean them up. In many cases your best option is to start from scratch, some bloggers have lost their whole site and have had to start over with nothing to show for their years of hard work.
This week I had a small WordPress site that I maintain for my mom hacked, luckily the database was intact so all I had to do was completely re-install WordPress and re-install themes and plug-ins to get it back up and running. That experience reminded me of a post I did a year ago about the importance of backing up WordPress that I thought I would re-post. How would you feel if you lost all those hundreds of hours that you put into blogging? Not very good I bet, in fact probably downright awful, so do yourself a favor and don’t ignore your backups…
 Have you ever had that awful sick to your stomach, oh shit feeling when you just realized you lost a lot of important data whether it be photos, documents or other important stuff that can’t easily be replaced? It sucks doesn’t it, usually it takes just one instance like that to inspire us to start taking backups seriously. Unfortunately though it won’t bring back what you lost. Backups are one of those things that many people don’t think about especially when they store data on a location that is hosted on the internet.
There are a great many people that are blogging about virtualization these days and most of them are using WordPress as their platform of choice to do it. WordPress is an ideal platform for blogging but all that hard work you put into blogging could be wiped out if you don’t properly backup your WordPress site.
But doesn’t my hosting provider backup my site?
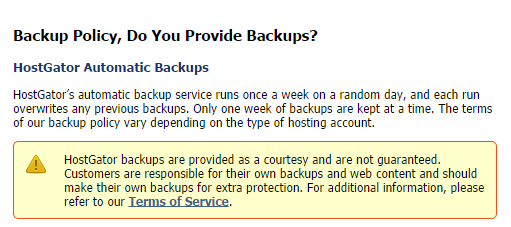
You should never trust that your hosting provider is backing up your website, many of them do not backup your content and if they do they probably do not guarantee them. Some hosting providers will offer a backup option as a paid add-on service. In addition they usually are not backing up your WordPress MySQL database which contains much of your valuable content. Take a look at this notice from my hosting provider, I think you’ll find the policy is similar with whatever provider you use, if you don’t know check with them.
How often should you backup your site?
Depending on how often you blog you should backup your WordPress instance at least once a month. If you are blogging several times a week you should probably do it daily or weekly. You should also do a backup before you upgrade WordPress to a newer version or update your plug-ins. Just like you do in the data center you should also plan on preserving older backups for as long as possible as often you may have something corrupted or malicious content that has been that way for a while that you need to go back a while to find a clean copy.
What should you backup?
With WordPress there are two main sets of data that you need to back up to ensure all your content is backed up and you can easily recover if needed, your WordPress files and your WordPress database. When you install WordPress on your website there are hundreds of files that get copied to specific directories that contain the complete WordPress web application. A new install of WordPress is only about 16MB in size with around 1,100 files but as you add content that will grow. Your WordPress database is typically hosted on a MySQL database that is installed and managed by your hosting provider. The WordPress database has many tables that store configuration and content for your WordPress website.
How do I back it up?
So now we know what needs to be backed up, how do we actually do it? There are several ways that you can backup WordPress:
- Manually by copying all your files to a PC using FTP and then doing a SQL export of your WordPress MySQL database and copying that to your local PC as well.
- Automatically by using some type of PHP script that can run scheduled on your hosting provider server using a scheduling tool like cron.
- Automatically using a WordPress plug-in designed to backup WordPress.
- Some hosting providers will do it if you pay for a add-on backup service.
Doing a manual backup
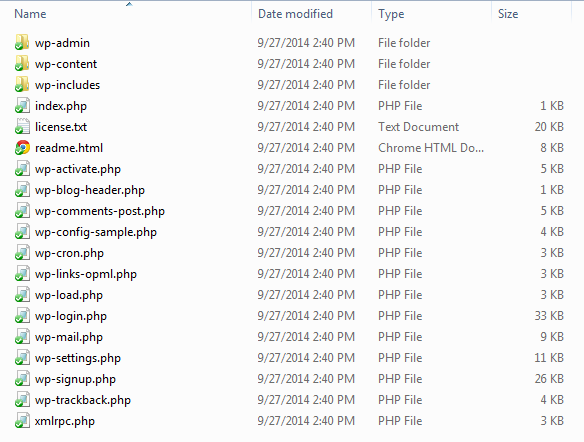
This method is OK for ad-hoc backups but it can be tedious to do on a frequent basis and it can easily slip your mind. I used this method for years, I did it nowhere near as often as I should of and I got lucky a few times were I almost lost a lot of data. To backup WordPress manually you will need to copy the all appropriate files and directories from the hosting provider web server to your local PC or even better to a cloud storage platform like Dropbox. Below are the files and directories that are come with a new install of WordPress.
The easiest way to move the files is to use an FTP application to copy them from your old server to your local PC and then to your new server. It’s also a good idea to periodically do this to backup WordPress. If you need a FTP client, check out FileZilla which is a free open source application. You may need to setup a FTP username/password on your hosting site before you can connect to it. Create a new site in FileZilla and give it a name (i.e. mywebsite-old), use the IP address or DNS name of your website and then enter in your login credentials. Once you connect to your web server you’ll see the directory listing of the contents, what you see will usually vary by hosting providers, some providers partition you off so you don’t see much of the web server files.
You may not need all the files you see to backup WordPress but its best to copy everything to a sub-directory on your PC so you do have a full backup just in case. In the figure above you can see the 3 WordPress directories that you need to copy for sure along with all the files that start with “wp” in the root directory. I’ve manually copied things to my site in the past (i.e. images) which I copy also. Other files that are part of the hosting platform you typically don’t need to bring over but it doesn’t hurt to copy them any way. Once you’ve copied everything to your PC it’s time to move on to the next step, backing up your MySQL database.
Your WordPress database is typically hosted on a MySQL database that is installed and managed by your hosting provider. The WordPress database has many tables that store configuration and content for your WordPress website. You can find a complete description of the database tables here. Log into your hosting provider control panel for your website and you should see a link for database management via phpMyAdmin which is a free software tool that is written in PHP that is used to administer MySQL over the Web. Once you launch phpMyAdmin you should be prompted for a username and password to connect to your database. You probably won’t know it or remember it but you can easily look it up by opening the wpconfig.php file that you copied to your PC as part of the backup in a text editor like Notepad and looking for the MySQL section which will contain your MySQL username/password.
Note some hosting providers may require you to whitelist your IP address to do remote MySQL administration, if they do there should be a section in your hosting control panel to put in your IP address. Once you are logged into phpMyAdmin you want to Export your database, click the Export link. You may be prompted for a quick export where you don’t need to enter a lot of options which will work just fine, if you do get a selection screen you typically can just use the defaults and then just hit Go and it will ask you for a location for the file on your PC and then begin the Export. It shouldn’t take more than a few minutes. Here’s how the Export screen looks with my hosting provider:
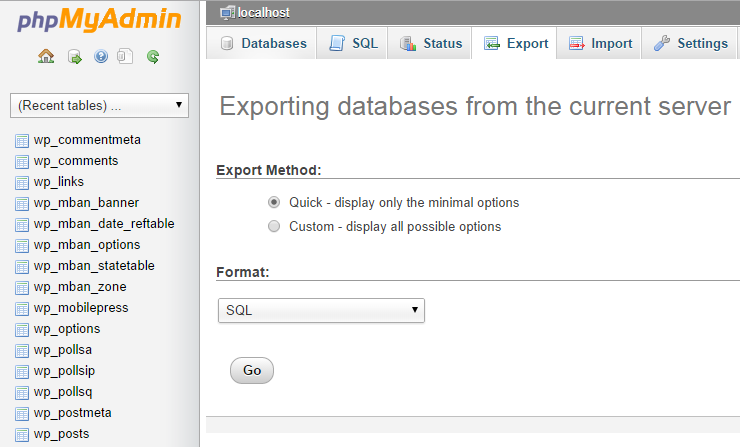
Once you have completed this it will create a .SQL file on your local PC that you should save with the other WordPress files that you copied. You now have everything you need to restore WordPress if needed by copying all the files you backed up back to the server and Importing the .SQL file back into WordPress, see my other post on moving to a new hosting provider for more info on how to do that.
Also note some hosting providers like GoDaddy provide a link in their control panel to kick off a database backup so you don’t have to go into PHPMyAdmin. They dump the resulting .SQL file in a db backup directory on your website, just make sure you copy the file from there to your local PC.
Doing an automatic backup with a PHP script and cron
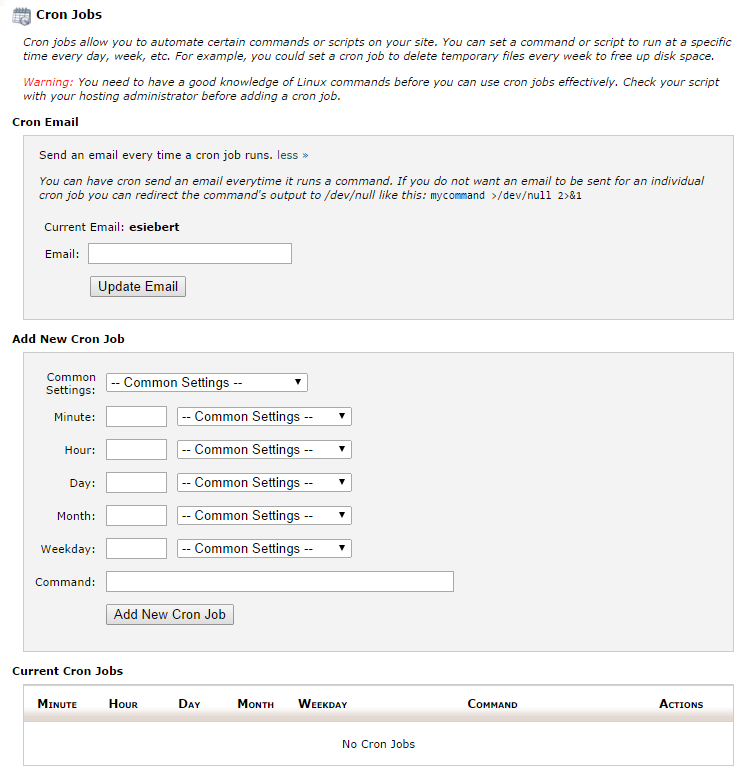
I’m not going to go into much detail on this method, it can be a bit technical to setup. There are some WordPress plug-ins available that will make this easier to setup. Your hosting provider control panel should have a section to setup and manage cron jobs like below:

You then need to configure the scheduling and action for the cron job for the cron job to perform like below:
Again look for some WordPress plug-ins that support cron or a PHP script that is written to backup WordPress MySQL databases. If you are feeling adventurous you could also write your own PHP script. Here’s one I found by searching the internet. Some scripts may only backup the database so make sure you know what the script is doing and where it is storing your backups.
Doing an automatic backup with WordPress plug-in
This is probably the easiest and most convenient way to backup your WordPress site. There are many plug-ins available that will automate the backup of both your WordPress files and MySQL database so you don’t have to do anything but install the plug-in and configure it. You can search through the WordPress plug-in directory and you’ll see many of them. The one I ended up using which had 4.8 out of 5 stars and is free but has some paid add-on’s is UpDraftPlus Backup & Restoration. You can go to their add-on page which contains a big list of add-on’s and pricing for each that expand the flexibility, functionality and backup targets supported. Another popular WordPress backup plug-in is BackWPup.
You can backup your site just fine with the free version but it only puts the backup files on your hosting web server. If you want to use other backup destinations like Dropbox, Amazon E3, Rackspace, Google Drive and more it will cost you about $10 for each. If you do backup to your website only just remember to copy those files off periodically to somewhere safe.
Install UpDraftPlus like you would any other WordPress plug-in, once activated go into Settings, UpDraftPlus Backups in WordPress to setup your backup jobs and you will be at the main screen:
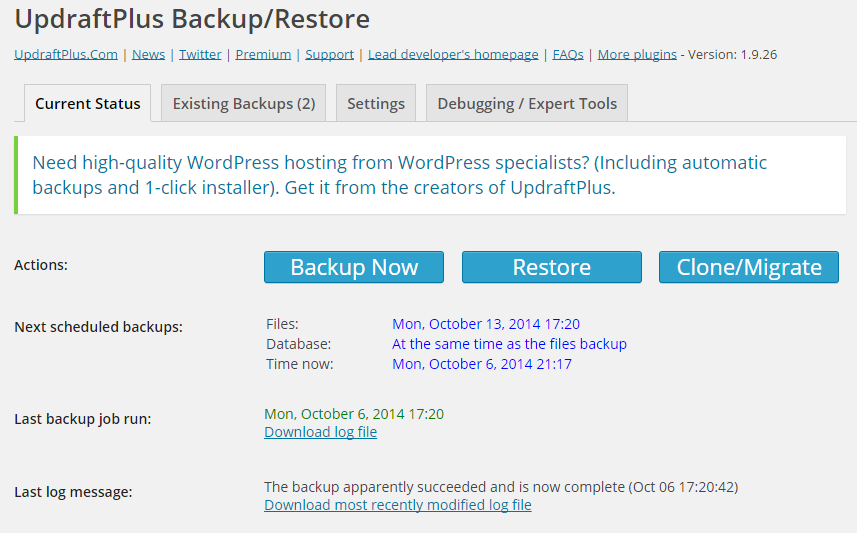
Here you can see your backup status and quick actions for backing up and restoring. It’s best to click on the Settings tab first to configure backup schedules and retention. Since most hosting providers now provide unlimited space don’t be afraid to retain a lot of backups.
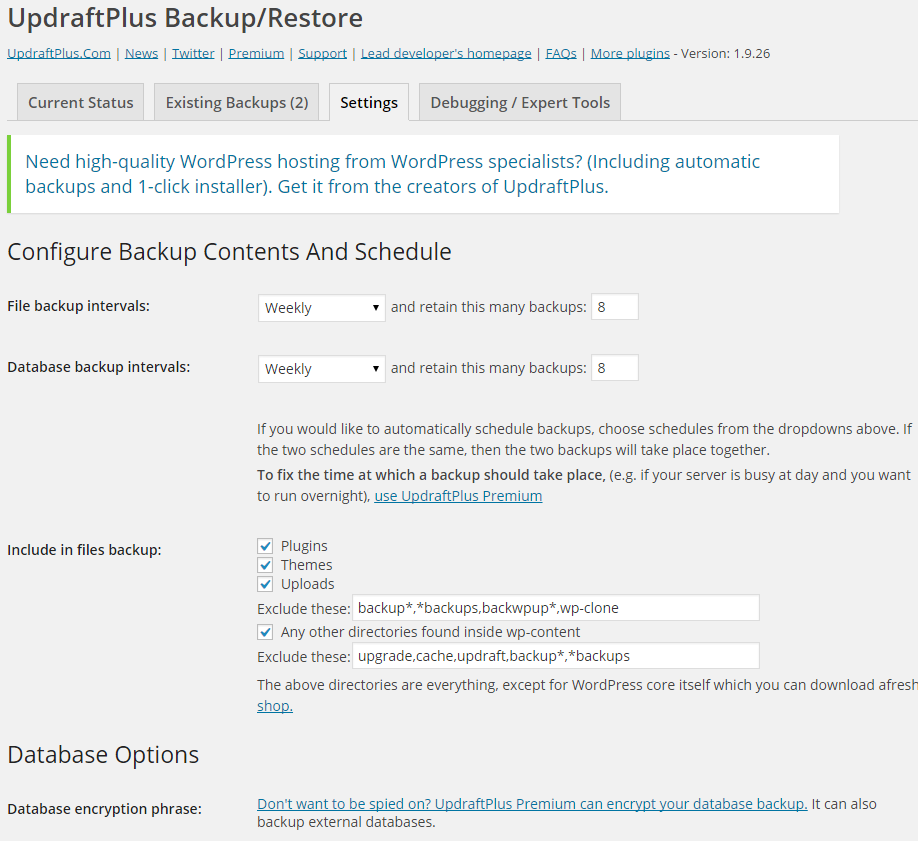
You can also specify what files to backup, database encryption if you are really paranoid, reporting, remote storage options and other advanced settings. Note by default with the free version it will not backup your core WordPress files (i.e. wp-admin) but unless you customize yours you won’t have to worry about those as you can easily download those again if needed. All the files specific to your WordPress site are in the Themes and Plugins directories.
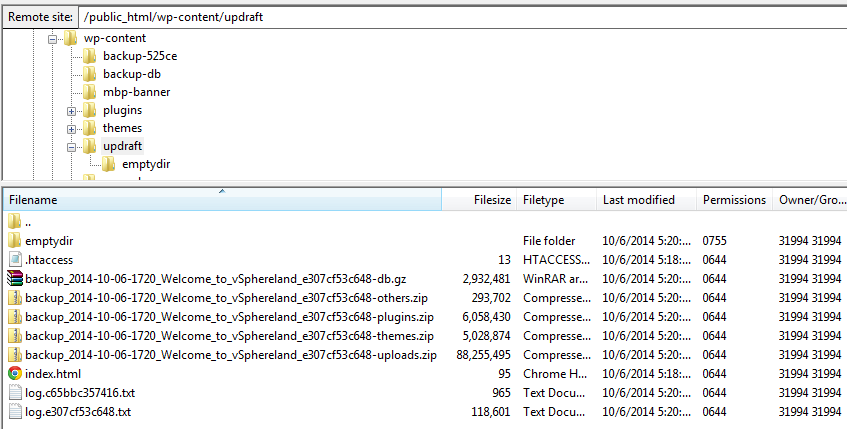
Once the backup runs you can look at the log files to see everything that occurred during the backup, it’s not something you’ll need to do regularly but I looked as I was curious. If you are using the free version which puts the backups into your WordPress directory you’ll see a new sub-directory under wp-content called updraft that contains your backup files all zipped up, make sure you backup these backup files somewhere else!
What about Backup as a Service?
If you prefer not to deal with your backups at all you can outsource them to a company that provides backup services for WordPress. Note both of these companies below backup both your WordPress files and database.

One such company that does this is blogVault. Their Basic plan starts at $9/month for backing up a single site and retain 30 days of backups. If you have more than one site you they have a Plus plan for $19/month that will backup 3 sites. It works by installing their WordPress plug-in on your site and then their server automatically contacts the plugin everyday to backup new changes to your site.
Another company that provides WordPress backup services is Backup Buddy. Their Blogger plan rate is $80/year for backing up 2 sites with 1GB of backup space available. Presumably with that much space available you could store more than 60 days of backups with them. They also have a Freelancer plan available for $100/year for up to 10 sites with 1GB of backup space. Again it works by installing their WordPress plug-in on your site and then configuring it, they have a video that demonstrates this process.
Summary
And that’s all there is to it, pick the service/method/plug-in that works best for you. For me I’ve setup UpDraftPlus and will also periodically do manual backups as well. Regardless of how you do it the important thing is that you are backing up your WordPress site which contains all your hard work that you do not want to ever take the chance of losing.
 Veeam Backup & Replication was first introduced as a 1.0 product back in 2008 and helped launch the revolution of the data protection industry with a backup product specifically designed for VMware environments. To put that in context with vSphere back in 2008 vSphere consisted of VirtualCenter 2.5 together with ESX 3.5 and ESXi was just being introduced. Back then Veeam was a small company consisting of around 10 employees. Fast forward to today and they’ve come a long way since that time, Veeam now has over 2,000 employees and has just released version 9 of their flagship Backup & Replication product. You can read more on the history of Veeam in a post I did back in 2014.

