Tag: vSphere

All about the UNMAP command in vSphere

There’s been a lot of confusion lately surrounding the UNMAP command which is used to reclaim deleted space on thin provisioning that is done at the storage array level. The source of the confusion is VMware’s support for it which has changed since the original introduction of the feature in vSphere 5.0. As a result I wanted to try and sum up everything around it to clear up any misconceptions around it.

So what exactly is UNMAP?

UNMAP is a SCSI command (not a vSphere 5 feature) that is used with thin provisioned storage arrays as a way to reclaim space from disk blocks that have been written to after the data that resides on those disk blocks has been deleted by an application or operating system. UNMAP serves as the mechanism that is used by the Space Reclamation feature in vSphere 5 to reclaim space left by deleted data. With thin provisioning once data has been deleted that space is still allocated by the storage array because it is not aware that the data has been deleted which results in inefficient space usage. UNMAP allows an application or OS to tell the storage array that the disk blocks contain deleted data so the array can un-allocate them which reduces the amount of space allocated/in use on the array. This allows thin provisioning to clean-up after itself and greatly increases the value and effectiveness of thin provisioning.

So why is UNMAP important?

In vSphere there are several storage operations that will result in data being deleted on a storage array. These operations include:

  • Storage vMotion, when a VM is moved from one datastore to another
  • VM snapshot deletion
  • Virtual machine deletion

Of these operations, Storage vMotion has the biggest impact on the efficiency of thin provisioning because entire virtual disks are moved between disks which results in a lot of wasted space that cannot be reclaimed without additional user intervention. The impact of Storage vMotion on thin provisioning prior to vSphere 5 was not significant because Storage vMotion was not a commonly used feature and was mainly used for planned maintenance on storage arrays. However with the introduction of Storage DRS in vSphere 5, Storage vMotion will be a common occurrence as VMs can now be dynamically moved around between datastores based on latency and capacity thresholds. This will have a big impact on thin provisioning because reclaiming the space consumed by VMs that have been moved becomes critical in order to maintaining an efficient and effective space allocation of thin provisioning storage capacity. Therefore UNMAP is important as it allows vSphere to inform the storage array when a Storage vMotion occurs or a VM or snapshot is deleted so those blocks can quickly be reclaimed to allow thin provisioned LUNs to stay as thin as possible.

How does UNMAP work in vSphere?

Prior to vSphere 5 and UNMAP when an operation occurred that deleted VM data from a VMFS volume, vSphere just looked up the inode on the VMFS file system and deleted the inode pointer which mapped to the blocks on disk. This shows the space as free on the file system but the disk blocks that were in use on the storage array are not touched and the array is not aware that they contain deleted data.

In vSphere 5 with UNMAP when those operations occur the process is more elaborate from a storage integration point of view, the inodes are still looked up like before, but instead of just removing the inode pointers a list of the logical block addresses (LBA) must be obtained. The LBA list contains the locations of all the disk blocks on the storage array that the inode pointers map to. Once vSphere has the LBA list it can start sending SCSI UNMAP commands for each range of disk blocks to free up the space on the storage array. Once the array acknowledges the UNMAP, the process repeats as it loops through the whole range of LBA’s to UNMAP.

So what is the issue with UNMAP in vSphere?

ESXi 5.0 issues UNMAP commands for space reclamation in critical regions during several operations with the expectation that the operation would complete quickly. Due to varied UNMAP command completion response times from the storage devices, the UNMAP operation can result in poor performance of the system which is why VMware is recommending that it be disabled on ESXi 5.0 hosts. The implementation and response times for the UNMAP operation may vary significantly among storage arrays. The delay in response time to the UNMAP operation can interfere with operations such as Storage vMotion and Virtual Machine Snapshot consolidation and can cause those operations to experience timeouts as they are forced to wait for the storage array to respond.

How can UNMAP be disabled?

In vSphere support for UNMAP is enabled by default but can be disabled via the command line interface, there is currently no way to disable this using the vSphere Client. Esxcli is a multi-purpose command that can be run from ESXi Tech Support Mode, the vSphere Management Assistant (vMA) or the vSphere CLI. Setting the EnableBlockDelete parameter to 0 disabled UNMAP functionality, setting it to 1 (the default) enables it. The syntax for disabling UNMAP functionality is shown below. Note the reference to VMFS3, this is just the parameter category and is the same regardless of if you are using VMFS3 or VMFS5.

  • esxcli system settings advanced set –int-value 0 –option /VMFS3/EnableBlockDelete

or you can use:

  • esxcfg-advcfg -s 1 /VMFS3/EnableBlockDelete

This command must be run individually on each ESXi host to disable UNMAP support. You can check the status of this parameter on a host by using the following command.

  • esxcfg-advcfg -g /VMFS3/EnableBlockDelete

It is possible to use a small shell script to automate the process of disabling UNMAP support to make it easier to update many hosts. A pre-built script to do this can be downloaded from here. Note changing this parameter takes effect immediately; there is no need to reboot the host for it to take effect. Without disabling the UNMAP feature, you may experience timeouts with operations such as Storage vMotion and VM snapshot deletion.

How did UNMAP change in vSphere 5.0 Update 1?

Soon after vSphere 5.0 was released VMware recalled the UNMAP feature and issued a KB article stating it was not supported and should be disabled via the advanced setting. With vSphere 5.0 Update 1 they disabled UNMAP by default, but they went one step further, if you try and enable it via the advanced setting it will still remain disabled. So there is no way to do automatic space reclamation in vSphere at the moment. What VMware did instead was introduce a manual reclamation method by modifying the vmkfstools CLI command and adding a parameter to it. The syntax for this is as follows:

  • vmkfstools -y <percent of free space>

The percentage of free space will create a virtual disk of the specified size, the command is run against an individual VMFS volume. So if a datastore has 800GB of free space left and you specify 50 as the free space parameter it will create a virtual disk 400GB in size, then delete it and UNMAP the space. This manual method of UNMAP has a few issues though, first it’s not very efficient, it’s creating a virtual disk without any regard for if the blocks are already reclaimed/un-used or not. Second it’s a very I/O intensive process and it is not recommended to run it during any peak workload times. Next it’s a manual process and you can’t really schedule it within vCenter Server, there are some scripting methods to get it run but it’s a bit of a chore. Finally since it’s a CLI command there is no way to really monitor it or log what occurs.

Another thing that VMware did in vSphere 5.0 Update 1 was invalidate all of the testing that was done with UNMAP for the Hardware Compatibility Guide. They required vendors to re-test with the manual CLI method and added a footnote to the HCG that said automatic reclamation is not supported and space can be reclaimed via command line tools as shown below.
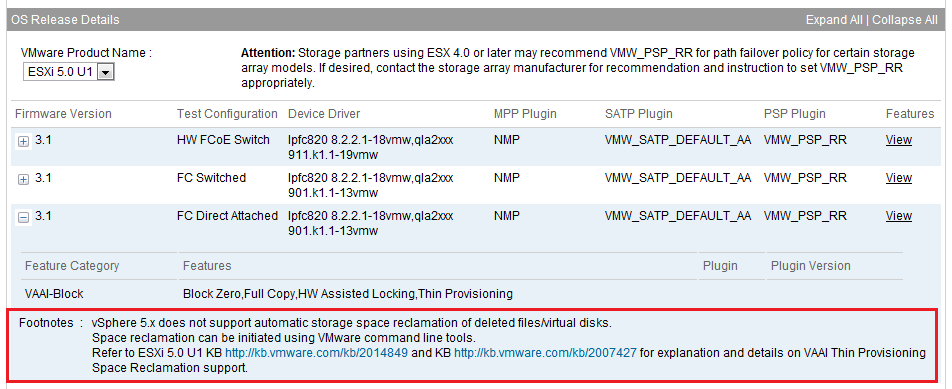
2012-07-18_220746-22

The manual CLI method of using UNMAP is not ideal, it works but it’s a bit of a kludge, until VMware introduces manual support again there is not a lot of value in using it because of the limitations.

When will VMware support automatic reclamation again?

Only time will tell, hopefully the next major release will enable it again. This was quite a setback for VMware and there was no easy fix so it may take a while before VMware has perfected it. Once it is back it will be a great feature to utilize as it really makes thin provisioning at the storage array level very efficient.

Where can I find out more about UNMAP?

Below are some useful links about UNMAP:

Share This:

The why and how of building a vSphere lab for work or home

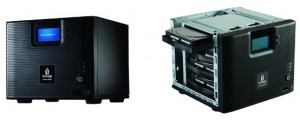
Be sure and register at the bottom of this article for your chance to win a Iomega ix4-200d 4TB Network Storage Cloud Edition provided by SolarWinds.

Having a server lab environment is a great way to experience and utilize the technology that we work with on a daily basis. This provides many benefits and can help you grow your knowledge and experience which can help your career growth.  With the horsepower of today’s server and versatility of virtualization, you can even build a home lab, allowing you the flexibility of playing around with servers, operating systems and applications in any way without worrying about impacting production systems at your work. Five years ago the idea of having a mini datacenter in your home was mostly unheard of due to the large amounts of hardware that it would require which would make it very costly.

Let’s first look at the reasons why you might want a home lab in the first place.

  • Certification Study – if you are trying to obtain one of the many VMware certifications, you really need an environment that you can use to study and prepare for an exam. Whether it’s building a mock blueprint for a design certification or gaining experience in an area you may be lacking a home lab provides you with a platform to do it all.
  • Blogging – if you want to join the ranks of the hundreds of people that are blogging about virtualization then you’ll need a place where you can experiment and play around so you can educate yourself on whatever topic you are blogging about.
  • Hands-on Experience – there really is no better way to learn virtualization than to use it and experience it firsthand. You can only learn so much from reading a book. You really need to get hands-on experience to maximize your learning potential.
  • Put it to work! – why not actually use it in your household? You can run your own infrastructure service in your house for things like file centralized management and even using VDI to provide access for kids.

There are several ways you can deploy a home lab, often times your available budget will dictate which one you choose. You can run a whole virtual environment within a virtual environment; this is called a nested configuration. To accomplish this in a home lab you typically run ESX or ESXi as virtual machines running under a hosted hypervisor like VMware Workstation. This allows you the flexibility of not having to dedicate physical hardware to your home lab and you can bring it up when needed on any PC. This also gives you the option of mobility, you can easily run it on a laptop that has sufficient resources (multi-core CPU, 4-8GB RAM) to handle it. This is also the most cost effective option as you don’t have to purchase dedicated server, storage and networking hardware for it. This option provides you with a lot of flexibility but has limited scalability and can limit some of the vSphere features that you can use.

You can also choose to dedicate hardware to a virtual lab and install ESX/ESXi directly on physical hardware. If you choose to do this you have two options for it, build your own server using hand-picked components or buy a name brand pre-built server.  The first option is referred to as a white box server as it is a generic server using many different brands of components. This involves choosing a case, motherboard, power supply, I/O cards, memory, hard disks and then assembling them into a full server.  Since you’re not paying for a name brand on the outside of the computer, the labor to assemble components, or an operating system, this option is often cheaper. You can also choose the exact components that you want and are not limited to specific configurations that a vendor may have chosen. While this option provides more flexibility in choosing a configuration at a lower cost there can be some disadvantages to this. The first is that you have to be skilled to put everything together. While not overly complicated, it can be challenging connecting all the cables and screwing everything in place. You also have to deal with compatibility issues, vSphere has a strict Hardware Compatibility List (HCL) of supported hardware and oftentimes components not listed will not work with vSphere as there is no driver for that component. This is frequently the case with I/O adapters such as network and storage adapters. However, as long as you do your homework and choose supported components or those known to work, you’ll be OK. Lastly, when it comes to hardware support you’ll have to work with more than one vendor, which can be frustrating.

The final option is using pre-assembled name-brand hardware from vendors like HP, Dell, Toshiba and IBM. While these vendors sell large rack-mount servers for data centers they also sell lower-end standalone servers that are aimed at SMB’s. While these may cost a bit more than a white box server everything is pre-configured and assembled and fully supported by one vendor. Many of these servers are also listed on the vSphere HCL so you have the peace of mind of knowing that they will work with vSphere. These servers can often be purchased for under $600 for the base models, from which you often have to add some additional memory and NICs. Some popular servers used in home labs include HP’s ML series and MicroServers as well as Dell’s PowerEdge tower servers.

No matter which server you choose you’ll need networking components to connect them. (if you choose to go with VMware Workstation instead of ESX or ESXi, one advantage is that all the networking is virtual so you don’t need any physical network components.) For standalone servers you’ll need a network hub or switch to plug your server’s NICs into. Having more NICs (4-6) in your servers provides you with more options for configuring separate vSwitches in vSphere. Using 2 or 4 port NICs from vendors like Intel can provide this more affordably. Just make sure they are listed on the vSphere HCL. While 100Mbps networking components will work okay, if you want the best performance from your hosts, use gigabit Ethernet, which has become much more affordable. Vendors like NetGear and Linksys make some good, affordable managed and unmanaged switches in configurations from 4 to 24 ports. Managed switches give you more configuration options and advanced features like VLANs, Jumbo Frames, LACP, QoS and port mirroring. Two popular models for home labs are NetGear’s ProSafe Smart Switches and LinkSys switches.

Finally having some type of shared storage is a must so you can use the vSphere advanced features that require it. There are two options for this: 1) use a Virtual Storage Appliance (VSA), which can turn local storage into shared storage, or 2) use a dedicated storage appliance. Both options typically use either the iSCSI or NFS storage protocols, which can be accessed via the software clients built into vSphere. A VSA provides a nice affordable option that allows you to use the hard disks that are already in your hosts to create shared storage. These utilize a virtual machine that has VSA software installed on it that handle the shared storage functionality. There are several free options available for this such as OpenFiler and FreeNAS. These can be installed on a VM or a dedicated physical server. While a VSA is more affordable it can be more complicated to manage and may not provide the best performance compared to a physical storage appliance. If you choose to go with a physical storage appliance there are many low cost models available from vendors like Qnap, Iomega, Synology, NetGear and Drobo. These come in configurations as small as 2-drive units all the way up to 8+ drive units and typically support both iSCSI and NFS protocols. These units will typically come with many of the same features that you will find on expensive SANs, so they will provide you with a good platform to gain experience with vSphere storage features. As an added bonus, these units typically come with many features that can be used within your household for things like streaming media and backups so you can utilize it for more than just your home lab.

One other consideration you should think about with a home lab is the environmental factor. Every component in your home lab will generate both heat and noise and will require power.  The more equipment you have, the more heat and noise you will have, and the more power you will use.  Having this equipment in an enclosed room without adequate ventilation or cooling can cause problems. Fortunately, most smaller tower servers often come with energy efficient power supplies that are no louder than a typical PC and do not generate much heat. However, if you plan on bringing home some old rack mount servers that are no longer needed at work for your lab, be prepared for the loud noise, high heat, and big power requirements that come with them.  One handy tool for your home lab is a device like the Kill-A-Watt, which can be used to see exactly how much power each device is using and what it will cost you to run. You can also utilize many of vSphere’s power saving features to help keep your costs down.

Finally, you’ll need software to run in your home lab. For the hypervisor you can utilize the free version of ESXi but this provides you with limited functionality and features. If you want to use all the vSphere features you can also utilize the evaluation version of vSphere, which is good for 60-days. However, you’ll need to re-install periodically once the license expires. If you happen to be a VMware vExpert, one of the perks is that you are provided with 1-year (Not For Resale) NFR licenses each year.  If you’re really in a pinch, oftentimes you can leverage vSphere licenses you may have at work in your home lab.

Once you have the hypervisor out of the way, you need tools to manage it, fortunately there are many free tools available to help you with this. Companies like SolarWinds offer many cool free tools that you can utilize in your home lab that are often based on the products they sell. Their VM Monitor can be run on a desktop PC and continuously monitors the health of your hosts and VMs.  They also have additional cool tools like their Storage Response Monitor which monitors the latency of your datastores as well a whole collection of other networking, server and virtualization tools. There is a comprehensive list of hundreds of free tools for your vSphere environment available here. A home lab is also a great place to try out software to kick the tires with it and gain experience. Whether it’s VMware products like View, vCloud Director, and SRM, or 3rd party vendor products like SolarWinds Virtualization Manager, your home lab gives you the freedom to try out all these products.  You can install them, see what they offer and how they work and learn about features such as performance monitoring, chargeback automation and configuration management. While most home labs are on the small size, if you do find yours growing out of control, you can also look at features that provide VM sprawl control and capacity planning to grow your home lab as needed.

There are plenty of options and paths you can take in your quest to build a home lab that will meet your requirements and goals. Take some time and plan out your route, there are many others that have built home labs and you can benefit from their experiences. No matter what your reasons are for building your home lab it will provide a great environment for you to learn, experience and utilize virtualization technology within it. If you’re passionate about the technology, you’ll find that a home lab is invaluable to fuel that passion and help your knowledge and experience with virtualization continue to grow and evolve.

ix4-200d

So to get you started with your own home lab, SolarWinds is providing a  Iomega ix4-200d 4TB Network Storage Cloud Edition that would be great to provide the shared storage which can serve as the foundation for your vSphere home lab. All you have to do to register for your chance to win is head on over to the entry page on SolarWind’s website to enter, the contest is open now and closes on June 23rd. On June 25th one entry will be randomly drawn to win and will be the lucky owner of a pretty cool NAS unit. So what are you waiting for, head on over to the entry page and register and don’t miss your chance to win.

banner260x130_vm_goldaward

Share This:

Escaping the Cave – A VMware admins worst fear

The worst security fear of any virtual environment is having a VM be able to gain access at the host level which can allow it to compromise any VM running on that host. If a VM was to gain access to a host it would essentially have the keys to the kingdom and because it has penetrated into the virtualization layer have a direct back door into any other VM. This has often been referred to as “escaping the cave” as the analogy goes that VMs all live in caves and are not allowed to escape it by the hypervisor.

caveman1

Typically this concern is most prevalent with hosted hypervisors like VMware Workstation that run a full OS under the virtualization layer. Bare metal hypervisors like ESX/ESXi have been fairly immune to this as they have direct contact with the bare metal of a server without a layer in between.

A new vulnerability was recently published that allows this exact scenario, fortunately if you’re a VMware shop it doesn’t affect you. It does affect pretty much every other hypervisor though that does not support the specific function that this vulnerability exploits.

You can read more about it here and here and specifically about VMware here. If you want to know more about security with VMware here’s an article I also wrote on how to steal a VM in 3 easy steps that you might find interesting. VMware also has a very good security blog that you can read here and a great overall security page with lots of links here. And if you want to follow one of VMware’s security guru’s (Rob Randell) who is a friend of mine and a fellow Colorado resident you can follow him here.

VMware has traditionally done an awesome job keeping ESX/ESXi very secure which is just one of the many reasons that they are the leader in virtualization. Security is a very big concern with virtualization and any vulnerabilities can have very large impacts which is why VMware takes it very seriously.

Here’s also an excerpt from my first book that talks about the escaping the cave concept:

Dealing with Security Administrators
This is the group that tends to put up the most resistance to VMware because of the fear that if a VM is compromised it will allow access to the host server and the other VMs on that host. This is commonly known as “escaping the cave,” and is more an issue with hosted products such as VMware Workstation and Server and less an issue with ESX, which is a more secure platform.

By the Way

The term escaping the cave comes from the analogy that a VM is trapped inside a cave on the host server. Every time it tries to escape from the cave, it gets pushed back in, and no matter what it does, it cannot escape from the cave to get outside. To date, there has never been an instance of a VM escaping the cave on an ESX server.

ESX has a securely designed architecture, and the risk level of this happening is greatly reduced compared to hosted virtual products such as Server and Workstation. This doesn’t mean it can’t happen, but as long as you keep your host patched and properly secured, the chances of it happening are almost nonexistent. Historically, ESX has a good record when it comes to security and vulnerabilities, and in May 2008, ESX version 3.0.2 and VirtualCenter 2.0.21 received the Common Criteria certification at EAL4+ under the Communications Security Establishment Canada (CSEC) Common Criteria Evaluation and Certification Scheme (CCS). EAL4+ is the highest assurance level that is recognized globally by all signatories under the Common Criteria Recognition Agreement (CCRA).

Share This:

Some great vSphere technical resources from VMware

Finding good technical information from VMware can be tough, VMware scatters it all across their websites & blogs and their is no one big technical library where you can view everything. I’m a junkie for great technical information on vSphere and have run across a number of great resources that I thought I would share with everyone:

1. You may be familiar with VMware Labs as they pump out a lot of those great Flings that are unofficial free tools that perform specific functions in a vSphere environment. They also have a publications section that has 50+ hardcore technical papers on topics like VisorFS, which explains the ESXI architecture in detail and vIC which explains Interrupt Control for VM storage device I/O. VMware has rolled a lot of these great publications up into a Technical Journal that they recently published.

2. You can find all of VMware’s patent listings at this website which helps explain exactly how a lot of their technology and features work. Here you can find out the technical details behind their DataMover component of the hypervisor which is responsible for moving and copying VM data for operations like Storage vMotion. You can also find out all the details on how their Fault Tolerance feature works as well.

3. In addition to problem solving articles, the VMware KB has a lot of great articles in it as well but finding them can be pretty challenging.  To find them you can search on types of documents and select technical articles that are not specific to problems and issues such as Best Practices, How-To’s and Information documents. Their is also a KBTV video blog as well that gives you video instruction on many of the popular KB topics.

4. The VMworld website has all of the recordings and materials from previous years VMworld’s. You can only access the previous year if you attended or purchase a subscription to them. But the years before the previous year are always made free after each VMworld and still contain a lot of good content. For example you can see all of the 2010 sessions here.

5. VMware has a video library for their Technical Publications on YouTube so if you don’t like reading about something you can see it in a visual manner instead. Most of the videos are fairly short (under 5 min), it would be nice if they could make these longer and put more information in them but they are still good to watch.

6. VMware has first rate documentation, it’s now available in PDF, EPUB and MOBI formats, download it all and put it on your Kindle, E-Reader or iPad so you always have it with you. It’s broken into specific guides now for areas such as storage, availability, networking, security, resource management, etc. This documentation is not just how to install and use the products, their is a lot of great information as well that is very educational.

7. Of course don’t forget the great technical papers that VMware frequently publishes, some great recent ones include Storage Protocol Comparison and another comparing Stretched Clusters to SRM.

8. Then there is the VMTN forums which is where a lot of topics get discussed, but there is also a Documents section in each of the forums that contains some great information that is more focused then the discussion threads. For example here is the Documents for the vSphere forum and for the vCenter forum.

9. Finally if there is one blog you must read besides Duncan’s, VMware’s vSphere Blog is it. The vSphere blog has become an aggregate for may other VMware technical blogs that focus on specific areas like storage, ESXi, DR/BC, Networking and Automation. Some of VMware’s great technical minds like Cormac Hogan, Frank Denneman, Duncan Epping, William Lam and Kyle Gleed.

If you have any other good VMware technical information sources let me know and I’ll add them to the list.

Share This:

vSphere Storage I/O Control: What it does and how to configure it

Storage is the slowest and most complex host resource, and when bottlenecks occur, they can bring your virtual machines (VMs) to a crawl. In a VMware environment, Storage I/O Control provides much needed control of storage I/O and should be used to ensure that the performance of your critical VMs are not affected by VMs from other hosts when there is contention for I/O resources.

Storage I/O Control was introduced in vSphere 4.1, taking storage resource controls built into vSphere to a much broader level. In vSphere 5, Storage I/O Control has been enhanced with support for NFS data stores and clusterwide I/O shares.

Prior to vSphere 4.1, storage resource controls could be set on each host at the VM level using shares that provided priority access to storage resources. While this worked OK for individual hosts, it is common for many hosts to share data stores, and since each host worked individually to control VM access to disk resources, VMs on one host could limit the amount of disk resources on other hosts.

The following example illustrates the problem:

  • Host A has a number of noncritical VMs on Data Store 1, with disk shares set to Normal
  • Host B runs a critical SQL Server VM that is also located on Data Store 1, with disk shares set to High
  • A noncritical VM on Host A starts generating intense disk I/O due to a job that was kicked off; since Host A has no resource contention, the VM is given all the storage I/O resources it needs
  • Data Store 1 starts experiencing a lot of demand for I/O resources from the VM on Host A
  • Storage performance for the critical SQL VM on Host B starts to suffer as a result

How Storage I/O Control works

Storage I/O Control solves this problem by enforcing storage resource controls at the data store level so all hosts and VMs in a cluster accessing a data store are taken into account when prioritizing VM access to storage resources. Therefore, a VM with Low or Normal shares will be throttled if higher-priority VMs on other hosts need more storage resources. Storage I/O Control can be enabled on each data store and, once enabled, uses a congestion threshold that measures latency in the storage subsystem. Once the threshold is reached, Storage I/O Control begins enforcing storage priorities on each host accessing the data store to ensure VMs with higher priority have the resources they need.

Read the full article at searchvirtualstorage.com…

Share This:

Storage I/O Bottlenecks in a Virtual Environment

Today I wanted to highlight another white paper that I wrote for SolarWinds that is titled “Storage I/O Bottlenecks in a Virtual Environment”. I enjoyed writing this one the most as it digs really deep into the technical aspects of storage I/O bottlenecks. This white paper covers topics such as the effects of storage I/O bottlenecks, common causes, how to identify them and how to solve them. Below is an excerpt from this white paper, you can register and read the full paper over at SolarWinds website.

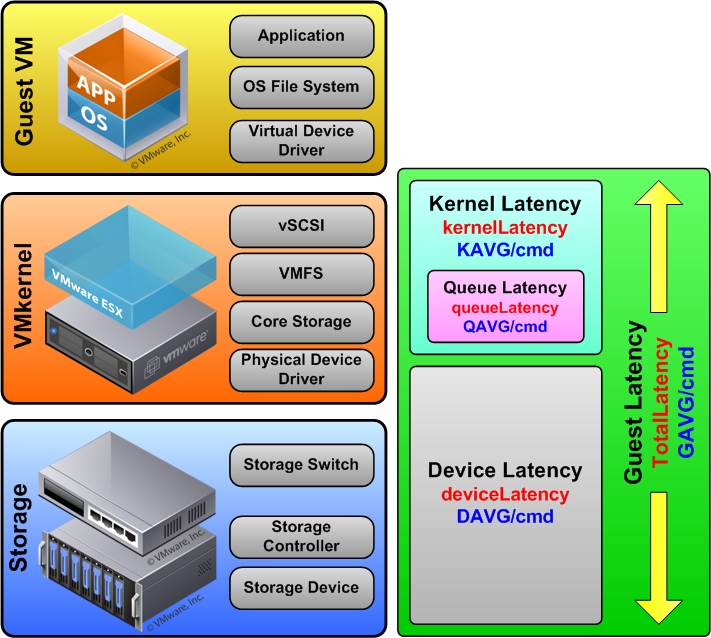
There are several key statistics that should be monitored on your storage subsystem related to bottlenecks but perhaps the most important is latency. Disk latency is defined as the time it takes for the selected disk sector to be positioned under the drive head so it can be read or written to. Once a VM makes a read or write to its virtual disk that request must follow a path to make its way from the guest OS to the physical storage device. A bottleneck can occur at different points along that path, there are different statistics that can be used to help pinpoint where the bottleneck is occurring in the path. The below figure illustrates the path that data takes to get from the VM to the storage device.

latency3

The storage I/O goes through the operating system as it normally would and makes its way to the device driver for the virtual storage adapter. From there it goes through the Virtual Machine Monitor (VMM) of the hypervisor which emulates the virtual storage adapter that the guest sees. It travels through the VMkernel and through a series of queues before it gets to the device driver for the physical storage adapter that is in the host. For shared storage it continues out the host on the storage network and makes its way to its final destination which is the physical storage device. Total guest latency is measured at the point where the storage I/O enters the VMkernel up to the point where it arrives at the physical storage device.

The total guest latency (GAVG/cmd as it is referred to in the esxtop utility) is measured in milliseconds and consists of the combined values of kernel latency (KAVG/cmd) plus device latency (DAVG/cmd). The kernel latency includes all the time that I/O spends in the VMkernel before it exits to the destination storage device. Queue latency (QAVG/cmd) is a part of the kernel latency but also measured independently. The device latency is the total amount of time that I/O spends in the VMkernel physical driver code and the physical storage device. So when I/O leaves the VMkernel and goes to the storage device this is the amount of time that it takes to get there and return. A guest latency value that is too high is a pretty clear indication that you have a storage I/O bottleneck that can cause severe performance issues. Once total guest latency exceeds 20ms you will notice the performance of your VMs suffer, as it approaches 50ms your VMs will become unresponsive.

Full paper including information on the key statistics related to storage I/O bottlenecks available here

Share This:

The top iPad applications for VMware admins

The iPad is becoming more and more popular in the enterprise, and not just for mobile workers. There is also a slew of iPad applications for VMware admins.

Many IT vendors see the iPad’s potential and are developing iPad apps that can manage their traditional hardware and software products. Xsigo Systems, for instance, has a very nice app called Xsigo XMS , which manages virtual I/O through the company’s XMS servers. There is also an iPad application called SiMU Pro that manages Cisco Systems Inc.’s Unified Computing System.

In addition, there are several iPad applications that can supplement the traditional VMware admin toolkit, including the vSphere Client and Secure Shell (SSH) applications. With the right iPad applications, VMware admins will reach a new level of management flexibility that’s not possible with traditional desktops and laptops.

TABLE OF CONTENTS

I. Top iPad applications for VMware management

II. Applications for remotely connecting to hosts and workstations

III. Top iPad applications for VMware networking

IV. General purpose iPad apps for VMware admins

I. TOP IPAD APPLICATIONS FOR VMWARE MONITORING AND MAINTENANCE
With the top iPad applications for infrastructure management, VMware admins can control basic functions, such as powering virtual machines (VMs) on and off and using vMotion.

These iPad apps mimic some of the functionality of the vSphere Client and service console, but they aren’t a full-fledge replacement. Even so, these iPad applications allow VMware admins to perform key virtualization tasks without a full-scale computer.

Read the full article at searchvmware.com…

Share This:

vSphere Fault Tolerance will soon support SMP

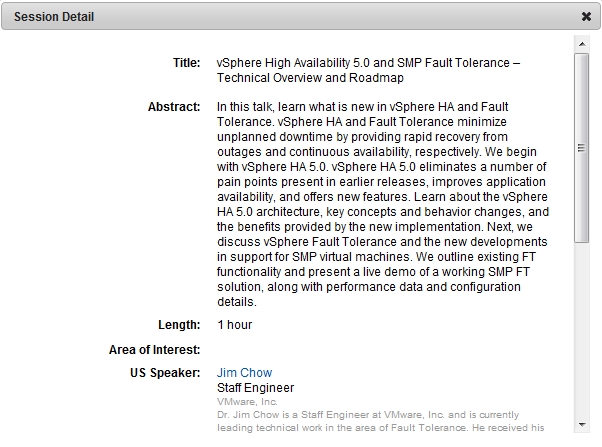
Came across this session in the VMworld 2011 lineup – (BCO2874 vSphere High Availability 5.0 and SMP Fault Tolerance – Technical Overview), according to the description the Fault Tolerance feature which previously only supported VM’s with a single vCPU will soon support vSMP. Providing this support has been a major development challenge for VMware as it is not an easy task to keep multiple CPUs in sync via lockstep. In fact I talked to VMware about it at the vSphere 5 launch and they said they were working with the CPU vendors to see if they could make it easier for them to do this. Well looks like they finally found a way, it will be interesting to see what they come up with, sign up for the VMworld session to find out more including a live demo. Since it’s not currently in vSphere 5.0 I’m guessing it may make it into a point release like vSphere 5.1.

2011-07-19_204530

Share This: