Tag: Home Lab

The new HP ProLiant MicroServer Gen8 – a great virtualization home lab server

I’ve always liked the small size of the HP MicroServer which makes it perfect for use in a virtualization home lab, but one area that I felt it was lacking was with the CPU. The original MicroServer came with a AMD Athlon II NEO N36L 1.3 Ghz dual-core processor which was pretty weak to use with virtualization and was more suited for small ultra-notebook PC’s that require small form factors and low power consumption. HP came out with enhanced N40L model a bit later but it was just a small bump up to the AMD Turion II Neo N40L/1.5GHz and later on to the N54L/2.2 Ghz dual-core processor. I have both the N36L & N40L MicroServers in my home lab and really like them except for the under-powered CPU.

Well HP just announced a new MicroServer model that they are calling Gen8 which is in line with their current Proliant server model generation 8. The new model not only looks way cool, it also comes in 2 different CPU configurations which give it a big boost in CPU power. Unfortunately while the GHz of the CPU makes a big jump, it’s still only available in dual-core. The two new processor options are:

Having a Pentium processor is a big jump over the Celeron and it comes with more L3 cache. Unfortunately though neither processor supports hyper-threading which would show as more cores to a vSphere host. Despite this its still a nice bump that makes the MicroServer even better for a virtualization home lab server. Note they switched from AMD to Intel processors with the Gen 8 models.

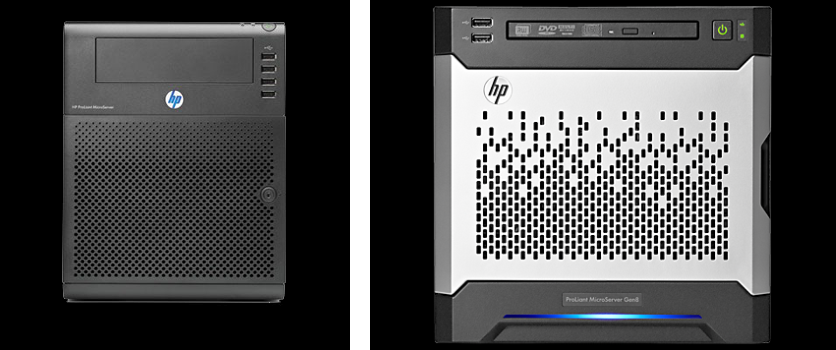
Lets start with a the cosmetic stuff on the new MicroServer, it has a radical new look (shown on the right below) which is consistent with it’s big brother Proliant servers, I personally think it looks pretty bad-ass cool.
2micros

Note the new slim DVD drive  opening on the Gen8 instead of the full size opening on the previous model. One thing to note is that while the new new Gen8 models are all depicted with a DVD drive, it does not come standard and must be purchased separately and installed. The Gen8 model is also a bit shorter and less deep and slightly wider than the old model. On the old model the HP logo would light up blue when powered on to serve as the health light and it looks like on the new model there is a blue bar at the bottom that lights up instead. There are also only 2 USB ports on the front now instead of 4. The old model also had keys (which I always misplace) to open the front to gain access to the drives and components, it looks like on the new model they did away with that and have a little handle to open it. On the back side they have moved the power supply and fan up a bit, removed one of the PCIe ports (only 1 now), removed the eSATA port, added 2 USB ports (2 of them 3.0) and added a 1GB NIC port. This is a nice change especially the addition of the second NIC which makes for more vSwitch options with vSphere. I have always added a 2-port NIC to my MicroServers as they only had 1 previously so it’s nice that it comes with 2.

Inside the unit still has 4 non-hot plug drive trays and supports up to 12TB of SATA disk (4 x 3TB). The storage controller is the HP Dynamic Smart Array B120i Controller which only supports RAID levels 0, 1 and 10. Also only 2 of the bays support 6.0Gb/s SATA drives, the other 2 support 3.0Gb/s SATA drives. There are still only 2 memory slots that support a maximum of 16GB (DDR3), this is another big enhancement as the previous model only supported 8GB maximum memory which limited it to how many VMs you could run on it. The Gen8 model also comes with a new internal microSD slot so you could boot ESXi from it if you wanted to, both the old & new still have an internal USB port as well. The server comes with the HP iLO Management Engine which is standard on all Proliant servers and is accessed through one of the NICs that does split-duty, but you have to license it to use many of the advanced features like the remote console. To license it costs a minimum of $129 for the iLO Essentials with 1 yr support which is a bit much for a home lab server that is under $500.

Speaking of cost  which has always made the MicroServer attractive for home labs, the G1610T model starts at $449 and the G2020T starts at $529, the two models are identical besides the processor and they both come standard with 2GB of memory and no hard drives. I wish they would not include memory in it and make it optional as well and lower the price. If you want to go to 8G or 16Gb of memory (who doesn’t) you have to take out the 2GB DIMM that comes with it and toss it and put in 4GB or 8GB DIMMs. Here are some of the add-on options and pricing on the HP SMB Store website:

  • HP 8GB (1x8GB) Dual Rank x8 PC3- 12800E (DDR3-1600) Unbuffered CAS-11 Memory Kit  [Add $139.00]
  • HP 4GB (1x4GB) Dual Rank x8 PC3-12800E (DDR3-1600) Unbuffered CAS-11 Memory Kit  [Add $75.00]
  • HP 500GB 6G Non-Hot Plug 3.5 SATA 7200rpm MDL Hard Drive  [Add $239.00]
  • HP 1TB 6G Non-Hot Plug 3.5 SATA 7200rpm MDL Hard Drive  [Add $269.00]
  • HP 2TB 6G Non-Hot Plug 3.5 SATA 7200rpm MDL Hard Drive  [Add $459.00]
  • HP 3TB 6G Non-Hot Plug 3.5 SATA 7200rpm MDL Hard Drive  [Add $615.00]
  • HP SATA DVD-RW drive [Add $129.00]
  • HP NC112T PCI Express Gigabit Server Adapter [Add $59.00]
  • HP 4GB microSD [Add $79.00]
  • HP 32GB microSD [Add $219.00]
  • HP iLO Essentials including 1yr 24×7 support [$129.00]

With all the add-ons the server cost can quickly grow to over $1000, not ideal for a home lab server. I’d recommend heading to New Egg & Micro Center and getting parts to upgrade the server. You can get a Kingston HyperX Blu 8GB DDR3-1600 Memory Kit for $69 or a Kingston HyperX Red 16GB DDR3-1600 Memory Kit for $119.00 which is half the cost.

All in all I really like the improvements they have made with the new model and it makes an ideal virtualization home lab server that you are typically building on a tight budget. HP if you want to send me one I’d love to do a full review on it. Listed below are some links for more information and a comparison of the old MicroServer G7 N54L and the new Gen8 G2020T model so you can see the differences and what has changed.

Comparison of the old MicroServer G7 N54L and the new Gen8 G2020T model:

FeatureOld MicroServer G7 (N54L)New MicroServer Gen8 (G2020T)
ProcessorAMD Turion II Model Neo N54L (2.20 GHz, 15W, 2MB)Intel Pentium G2020T (2.5GHz/2-core/3MB/35W)
Cache2x 1MB Level 2 cache3MB (1 x 3MB) L3 Cache
ChipsetAMD RS785E/SB820MIntel C204 Chipset
Memory2 slots - 8GB max - DDR3 1333MHz2 slots - 16GB max - DDR3 1600MHz/1333MHz
NetworkHP Ethernet 1Gb 1-port NC107i AdapterHP Ethernet 1Gb 2-port 332i Adapter
Expansion Slot2 - PCIe 2.0 x16 & x1 Low Profile1 - PCIe 2.0 x16 Low Profile
Storage ControllerIntegrated SATA controller with embedded RAID (0, 1)HP Dynamic Smart Array B120i Controller (RAID 0, 1, 10)
Storage Capacity (Internal)8.0TB (4 x 2TB) SATA12.0TB (4 x 3TB) SATA
Power SupplyOne (1) 150 Watts Non-Hot PlugOne (1) 150 Watts Non-Hot Plug
USB ports2.0 Ports - 2 rear, 4 front panel, 1 internal2.0 Ports - 2 front, 2 rear, 1 internal) 3.0 Ports - 2 rear
microSDNoneOne - internal
Dimensions (H x W x D) 10.5 x 8.3 x 10.2 in9.15 x 9.05 x 9.65 in
Weight (Min/Max)13.18 lb/21.16 lb15.13 lb/21.60 lb
Acoustic Noise24.4 dBA (Fully Loaded/Operating)21.0 dBA (Fully Loaded/Operating)
Share This:

Your chance to win a very cool complete home lab

Putting together a good home lab can be costly, sure you can go the cheap route using nested hypervisors with VMware Workstation but it’s more fun to use physical hardware for it. Nested hypervisors also have limitations that restrict what you can do with it. Veeam is giving away a dream home lab at VMworld, I looked at the hardware that they are including and it makes for one very sweet home lab. From their promotional page it looks to be 2 HP ML110 G7 servers, these are nice boxes, I have 2 of them myself in my home lab and they’re very expandable (lots of PCI slots and up to 16GB memory) , powerful and quiet with low power consumption. Note that while they are not on the vSphere HCL, they work just fine and also support all the vSphere features including VMDirectPath, Fault Tolerance  and power saving features. They come with 2 1GB NICs, one of which is the shared iLO which makes it easier to manage them remotely without having to hookup a monitor, keyboard and mouse to them. I believe you have to license the iLO functionality, whoever wins the home lab if you don’t have it drop me an email and I’ll see if I can get you a NFR key for them.

You also get a HP V1410-16G Ethernet switch, it’s not a managed switch but you still get 16 ports of 1GB Ethernet to connect everything together. I added additional dual port 1GB NICs to my ML110’s so I have 6 NICs in each which allows you to do more with virtual networking which can quickly fill up an 8-port switch so having 16 is nice. I went with the Intel PRO/1000 PT model which if you shop around you can get for around $100. To connect all your networking, you can save a lot of money by buying your network cables from monoprice.com, they have great quality cables in a wide variety of lengths and colors. I used different color cables for different networking functions such as iLO, FT Logging, iSCSI and management console.

Finally they are including a NetGear ReadyNAS storage device, not sure which model it is but it looks like a 4 drive Pro Series model. What’s even sweeter is they are populating it with SSD drives so your VMs will really fly. NetGear makes great low-end storage arrays, I have a NetGear 2100 in my home lab and it’s very solid, has great features and performs very well.

veeam-dream

So how do you win this great home lab? It’s an easy 2 step process.

  1. Attend VMworld
  2. Stop by Veeam’s booth #1709

That’s it, good luck to all!

UPDATE: Forgot to include that Veeam is also giving you all the software you need to get up and running including vSphere licenses, Microsoft Technet subscription and off course Veeam software.

Share This:

The why and how of building a vSphere lab for work or home

Be sure and register at the bottom of this article for your chance to win a Iomega ix4-200d 4TB Network Storage Cloud Edition provided by SolarWinds.

Having a server lab environment is a great way to experience and utilize the technology that we work with on a daily basis. This provides many benefits and can help you grow your knowledge and experience which can help your career growth.  With the horsepower of today’s server and versatility of virtualization, you can even build a home lab, allowing you the flexibility of playing around with servers, operating systems and applications in any way without worrying about impacting production systems at your work. Five years ago the idea of having a mini datacenter in your home was mostly unheard of due to the large amounts of hardware that it would require which would make it very costly.

Let’s first look at the reasons why you might want a home lab in the first place.

  • Certification Study – if you are trying to obtain one of the many VMware certifications, you really need an environment that you can use to study and prepare for an exam. Whether it’s building a mock blueprint for a design certification or gaining experience in an area you may be lacking a home lab provides you with a platform to do it all.
  • Blogging – if you want to join the ranks of the hundreds of people that are blogging about virtualization then you’ll need a place where you can experiment and play around so you can educate yourself on whatever topic you are blogging about.
  • Hands-on Experience – there really is no better way to learn virtualization than to use it and experience it firsthand. You can only learn so much from reading a book. You really need to get hands-on experience to maximize your learning potential.
  • Put it to work! – why not actually use it in your household? You can run your own infrastructure service in your house for things like file centralized management and even using VDI to provide access for kids.

There are several ways you can deploy a home lab, often times your available budget will dictate which one you choose. You can run a whole virtual environment within a virtual environment; this is called a nested configuration. To accomplish this in a home lab you typically run ESX or ESXi as virtual machines running under a hosted hypervisor like VMware Workstation. This allows you the flexibility of not having to dedicate physical hardware to your home lab and you can bring it up when needed on any PC. This also gives you the option of mobility, you can easily run it on a laptop that has sufficient resources (multi-core CPU, 4-8GB RAM) to handle it. This is also the most cost effective option as you don’t have to purchase dedicated server, storage and networking hardware for it. This option provides you with a lot of flexibility but has limited scalability and can limit some of the vSphere features that you can use.

You can also choose to dedicate hardware to a virtual lab and install ESX/ESXi directly on physical hardware. If you choose to do this you have two options for it, build your own server using hand-picked components or buy a name brand pre-built server.  The first option is referred to as a white box server as it is a generic server using many different brands of components. This involves choosing a case, motherboard, power supply, I/O cards, memory, hard disks and then assembling them into a full server.  Since you’re not paying for a name brand on the outside of the computer, the labor to assemble components, or an operating system, this option is often cheaper. You can also choose the exact components that you want and are not limited to specific configurations that a vendor may have chosen. While this option provides more flexibility in choosing a configuration at a lower cost there can be some disadvantages to this. The first is that you have to be skilled to put everything together. While not overly complicated, it can be challenging connecting all the cables and screwing everything in place. You also have to deal with compatibility issues, vSphere has a strict Hardware Compatibility List (HCL) of supported hardware and oftentimes components not listed will not work with vSphere as there is no driver for that component. This is frequently the case with I/O adapters such as network and storage adapters. However, as long as you do your homework and choose supported components or those known to work, you’ll be OK. Lastly, when it comes to hardware support you’ll have to work with more than one vendor, which can be frustrating.

The final option is using pre-assembled name-brand hardware from vendors like HP, Dell, Toshiba and IBM. While these vendors sell large rack-mount servers for data centers they also sell lower-end standalone servers that are aimed at SMB’s. While these may cost a bit more than a white box server everything is pre-configured and assembled and fully supported by one vendor. Many of these servers are also listed on the vSphere HCL so you have the peace of mind of knowing that they will work with vSphere. These servers can often be purchased for under $600 for the base models, from which you often have to add some additional memory and NICs. Some popular servers used in home labs include HP’s ML series and MicroServers as well as Dell’s PowerEdge tower servers.

No matter which server you choose you’ll need networking components to connect them. (if you choose to go with VMware Workstation instead of ESX or ESXi, one advantage is that all the networking is virtual so you don’t need any physical network components.) For standalone servers you’ll need a network hub or switch to plug your server’s NICs into. Having more NICs (4-6) in your servers provides you with more options for configuring separate vSwitches in vSphere. Using 2 or 4 port NICs from vendors like Intel can provide this more affordably. Just make sure they are listed on the vSphere HCL. While 100Mbps networking components will work okay, if you want the best performance from your hosts, use gigabit Ethernet, which has become much more affordable. Vendors like NetGear and Linksys make some good, affordable managed and unmanaged switches in configurations from 4 to 24 ports. Managed switches give you more configuration options and advanced features like VLANs, Jumbo Frames, LACP, QoS and port mirroring. Two popular models for home labs are NetGear’s ProSafe Smart Switches and LinkSys switches.

Finally having some type of shared storage is a must so you can use the vSphere advanced features that require it. There are two options for this: 1) use a Virtual Storage Appliance (VSA), which can turn local storage into shared storage, or 2) use a dedicated storage appliance. Both options typically use either the iSCSI or NFS storage protocols, which can be accessed via the software clients built into vSphere. A VSA provides a nice affordable option that allows you to use the hard disks that are already in your hosts to create shared storage. These utilize a virtual machine that has VSA software installed on it that handle the shared storage functionality. There are several free options available for this such as OpenFiler and FreeNAS. These can be installed on a VM or a dedicated physical server. While a VSA is more affordable it can be more complicated to manage and may not provide the best performance compared to a physical storage appliance. If you choose to go with a physical storage appliance there are many low cost models available from vendors like Qnap, Iomega, Synology, NetGear and Drobo. These come in configurations as small as 2-drive units all the way up to 8+ drive units and typically support both iSCSI and NFS protocols. These units will typically come with many of the same features that you will find on expensive SANs, so they will provide you with a good platform to gain experience with vSphere storage features. As an added bonus, these units typically come with many features that can be used within your household for things like streaming media and backups so you can utilize it for more than just your home lab.

One other consideration you should think about with a home lab is the environmental factor. Every component in your home lab will generate both heat and noise and will require power.  The more equipment you have, the more heat and noise you will have, and the more power you will use.  Having this equipment in an enclosed room without adequate ventilation or cooling can cause problems. Fortunately, most smaller tower servers often come with energy efficient power supplies that are no louder than a typical PC and do not generate much heat. However, if you plan on bringing home some old rack mount servers that are no longer needed at work for your lab, be prepared for the loud noise, high heat, and big power requirements that come with them.  One handy tool for your home lab is a device like the Kill-A-Watt, which can be used to see exactly how much power each device is using and what it will cost you to run. You can also utilize many of vSphere’s power saving features to help keep your costs down.

Finally, you’ll need software to run in your home lab. For the hypervisor you can utilize the free version of ESXi but this provides you with limited functionality and features. If you want to use all the vSphere features you can also utilize the evaluation version of vSphere, which is good for 60-days. However, you’ll need to re-install periodically once the license expires. If you happen to be a VMware vExpert, one of the perks is that you are provided with 1-year (Not For Resale) NFR licenses each year.  If you’re really in a pinch, oftentimes you can leverage vSphere licenses you may have at work in your home lab.

Once you have the hypervisor out of the way, you need tools to manage it, fortunately there are many free tools available to help you with this. Companies like SolarWinds offer many cool free tools that you can utilize in your home lab that are often based on the products they sell. Their VM Monitor can be run on a desktop PC and continuously monitors the health of your hosts and VMs.  They also have additional cool tools like their Storage Response Monitor which monitors the latency of your datastores as well a whole collection of other networking, server and virtualization tools. There is a comprehensive list of hundreds of free tools for your vSphere environment available here. A home lab is also a great place to try out software to kick the tires with it and gain experience. Whether it’s VMware products like View, vCloud Director, and SRM, or 3rd party vendor products like SolarWinds Virtualization Manager, your home lab gives you the freedom to try out all these products.  You can install them, see what they offer and how they work and learn about features such as performance monitoring, chargeback automation and configuration management. While most home labs are on the small size, if you do find yours growing out of control, you can also look at features that provide VM sprawl control and capacity planning to grow your home lab as needed.

There are plenty of options and paths you can take in your quest to build a home lab that will meet your requirements and goals. Take some time and plan out your route, there are many others that have built home labs and you can benefit from their experiences. No matter what your reasons are for building your home lab it will provide a great environment for you to learn, experience and utilize virtualization technology within it. If you’re passionate about the technology, you’ll find that a home lab is invaluable to fuel that passion and help your knowledge and experience with virtualization continue to grow and evolve.

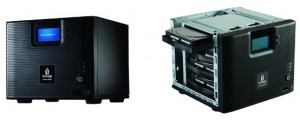
ix4-200d

So to get you started with your own home lab, SolarWinds is providing a  Iomega ix4-200d 4TB Network Storage Cloud Edition that would be great to provide the shared storage which can serve as the foundation for your vSphere home lab. All you have to do to register for your chance to win is head on over to the entry page on SolarWind’s website to enter, the contest is open now and closes on June 23rd. On June 25th one entry will be randomly drawn to win and will be the lucky owner of a pretty cool NAS unit. So what are you waiting for, head on over to the entry page and register and don’t miss your chance to win.

banner260x130_vm_goldaward

Share This: