Category: News

Update on vSphere 4.1 power settings from my Tidbits post

I had a comment from a VMware engineer on my recent vSphere 4.1 Tidbits post that talked about the new power monitoring feature that clarified some things and I thought I would share it with everyone. There isn’t much documentation on this stuff yet so every little bit of information helps. From Tim Mann at VMware:

Let me clarify your paragraph on displaying host and VM power usage.  It muddles those two features together a bit.

(1) The feature of displaying the host power consumption is not
experimental and is always on, but will display 0 watts if the host
is not supported or does not have a power meter.  Hopefully most people
should not have to edit /usr/share/sensors/vmware to get support for
their host, but if you do, the instructions in the paragraph are OK.
Here are some more detailed instructions and additional lines that
are going into esx4.1u1:

#
# This file contains a list of power sensors that are known to VMware, Inc.
#
# OEMs: to add support for new machines, do not modify this file
# directly, but place a new file in this directory instead.
#
# Supported format:
#
#  EntryType:SensorType:Manufacturer:Product:Sensor1[,Sensor2…]:Units
#
# EntryType must be “default”, SensorType must be “power”, and Units
# must be “WATTS” (all without quotation marks).
#
# Manufacturer and Product are compared against the system’s DMI (also
# known as SMBIOS) information from its System Information (Type 1)
# record.  Manufacturer and Product are both case-insensitive and will
# match even if the actual name is longer; for example, “
Dell” would
# match “DELL, INC.”.  Product may be “*” to match all products from
# the specified Manufacturer.
#
# Sensor names are case-sensitive and must match exactly.  If multiple
# Sensors are listed on a line (up to 4), sensord reads them all, sums
# them, and reports the total as the system power.  It is acceptable
# for not all of the sensors listed on a line to be present; sensord
# will skip any that are missing as long as at least one is present.
#
default:power:FUJITSU:*:Pwr Mon:WATTS
default:power:FUJITSU:*:Total Power:WATTS
default:power:FUJITSU:*:SYSTEM:WATTS
default:power:FUJITSU:*:PSU1 Power,PSU2 Power:WATTS
default:power:Dell:*:System Level:WATTS
default:power:HP:*:Power Supply 1,Power Supply 2:WATTS
default:power:Hewlett-Packard:*:Power Meter:WATTS
default:power:Hewlett-Packard:*:Power Supply 1,Power Supply 2:WATTS
default:power:NEC:*:POWER:WATTS
default:power:NEC:*:Power:WATTS
default:power:NEC:*:Input_Power:WATTS
default:power:NEC:*:System Power:WATTS
default:power:MITSUBISHI:*:POWER:WATTS
default:power:MITSUBISHI:*:Power:WATTS
default:power:TOSHIBA:*:POWER:WATTS
default:power:TOSHIBA:*:Power:WATTS
default:power:BULL:*:POWER:WATTS

(2) The feature of displaying per-VM power consumption is experimental
and off by default.  It can be turned on with an advanced config option
as the paragraph describes.  The per-VM power consumption feature is
dependent on the host power consumption feature.

Share This:

Train Signal’s new Pro Series video – my experience

Train Signal approached me a few months ago about doing some video training for them in their new Pro Series line of videos. They asked me for topic suggestions and I presented several ideas to them and they ultimately chose the one on vSphere advanced features. I really enjoy exploring new features, big and small, and I’m not content with just figuring out how to use them but also need to know how they work in-depth. As a result I spend a lot of time researching and playing around to find out all the in’s-n-out’s of a feature. I had plenty of experience with the features but the actual recording process was new to me. As a result I approached it as a producer might do for a movie. I first jotted down an outline to use for creating Powerpoint slides, next I created the slides themselves, once I had the slides finalized I created a script for each slide complete with all the text and any demonstration sections. The reason I created the script was because I didn’t want to leave anything out and I wanted everything to be perfect especially if I had to do multiple takes when recording the videos.

Once I had all that down I started creating the videos, I basically created an AVI file for each slide which the editors at Train Signal stitched together to create the final production. In some cases I recorded some slides several times as I don’t like even minor speaking mistakes to be present in the recordings. It was quite a long tedious process and the more I got into it the more comfortable I became with doing it. I think the end result was pretty good, I tend to be highly critical of myself and as a result try to make sure everything is perfect. I have a few work ethics I live by:

  1. Don’t do anything half-ass
  2. Go big or go home
  3. Over-commit and over-deliver.

In a nutshell I try to deliver high-quality work all the time and always exceed expectations. So I think the videos turned out great and I hope you enjoy them, my advanced features videos covered the following features:

  • VMCI
  • VMDirectPath
  • Dynamic Voltage and Frequency Scaling (DVFS)
  • DPM
  • Fault Tolerance
  • pvSCSI adapters
  • VMFS volume grow and VM disk hot-add (and other disk related stuff)
  • VMotion and Storage VMotion
  • Thin Provisioning

Combined with the other great content from David Davis, Sean Clark and Hal Rottenberg the vSphere Pro Series Volume 2 should be a great training resource for both beginning and experienced vSphere administrators. Overall I had a good experience creating the videos and I look forward to doing more of them in the future. Enjoy!

Share This:

vSphere 4.1 – The Links

vSphere 4.1 is finally out, here’s all the links you need to get you started with it, keep checking back as this post is a work in progress and will keep growing. Be sure and check out the valuable KB articles at the bottom of this post.

Features:

What’s New in VMware vSphere 4.1
What’s new in Networking with vSphere 4.1 (VMware white paper)
What’s new in vCenter Server 4.1 (VMware white paper)
What’s new in Availability & Resource Manager in vSphere 4.1 (VMware white paper)
What’s new in Performance for vSphere 4.1 update (VMware white paper)
What’s new in vSphere 4.1 storage (VMware white paper)

Release Notes:

VMware vSphere 4.1 Release Notes – ESX Edition
VMware vSphere 4.1 Release Notes – ESXi Edition
vSphere CLI 4.1 Release Notes

Other:

vSphere Hypervisor FAQ (Free ESXi)
ESXi 4.1 Migration Guide (VMware white paper)
VMware vSphere: The CPU Scheduler in VMware ESX 4.1 (VMware white paper)
Understanding Memory Resource Management in VMware ESX 4.1 (VMware white paper)
Managing performance variance of applications using Storage IO control (VMware white paper)
Microsoft Office SharePoint Server 2007 Performance on VMware vSphere 4.1 (VMware white paper)
What is new in vSphere SDKs 4.1 (YouTube video)
vSphere 4.1 and EMC – VAAI – Hardware Accelerated Full Copy (YouTube video)

Blog posts:

Tidbits on the new vSphere 4.1 release (vSphere-land)
Test ESXi 4.1 today, migrate smoothly from ESX tomorrow (SearchVMware.com)
VMware vSphere 4.1 HA and DRS clustering improvements (SearchVMware.com)
What’s new in ESXi 4.1: Active Directory integration, Tech Support Mode and more (SearchVMware.com)
VMware VAAI pros and cons and the hidden fourth primitive (SearchVMware.com)
VMware vSphere 4.1: Not the Typical .1 Release (Chris Wolf)
It’s here! The latest version of ESXi (ESXi Chronicles)
VMware vSphere 4.1: Advancing the Platform for Cloud Computing (The Console)
Proportional Allocation of Shared Storage Resources using Storage I/O Control (Vroom!)
Understanding Memory Resource Management in VMware ESX Server 4.1 (Vroom!)
Got Network I/O Control? (VMware Networking blog)
Steve Herrod, VMware’s CTO, Introduces VMware vSphere 4.1 (VMware TV)
Introducing VMware Sphere Hypervisor 4.1 – the free edition of VMware vSphere 4.1 (vSphere Blog)
Upgrading to SRM 4.1 – including upgrading to vSphere VirtualCenter 4.1 (VMware Uptime)
VDR and vSphere 4.1 compatibility (VMware Uptime)
A Few Gotchas With vSphere 4.1! (Daily Hypervisor)
PowerCLI 4.1 is out (PowerCLI blog)
vDS in PowerCLI 4.1 (PowerCLI blog)
PowerCLI 4.1: A fork in the road (Poshoholic)
VIDEO: New vSphere 4.1 ESXi Tech Support Mode (VMware Videos)
VIDEO: New vSphere 4.1 Windows Active Directory Authentication (VMware Videos)
VIDEO: vChat – Episode 1 – New vSphere 4.1 and Top 15 Killer Features (VMware Videos)
vSphere 4.1 and vStorage APIs for Array Integration (VAAI) (Virtual Storage Guy)
VMware vSphere VAAI Demo with NetApp (Virtual Storage Guy)
The Migration From ESX to ESXi is Happening. Moving Configurations (Kendrick Coleman)
vSphere 4.1 Memory Enhancements – Compression (NTPro.nl)
vSphere 4.1 – Virtual Serial Port Concentrator (NTPro.nl)
VMware boosts performance with vSphere 4.1 (SearchVirtualDataCentre)
Performance Improvements on vSphere 4.1 (another Case Study) (My Virtual Cloud)
vSphere 4.1 – What do the vStorage APIs for Array Integration mean to you? (Virtual Geek)
vSphere 4.1: VPXA Holds ESX Host at Ransom (Virtual VCP)
What’s New in vSphere 4.1 – Storage I/O Control (Technodrone)
What’s New in vSphere 4.1 – Network I/O Control (Technodrone)
VMware vSphere 4.1 released – What’s new? (Gabe’s Virtual World)
vSphere 4.1, VMware HA New maximums and DRS integration will make our life easier (Yellow Bricks)
New vSphere 4.1 CLI Utilities Marketing Did Not Tell You About Part 1 & Part 2 & Part 3 (Virtually Ghetto)
New way of enabling and disabling services using vSphere 4.1 (Virtually Ghetto)
ESXi 4.1 – Major Security Issue (Virtually Ghetto)
resxtop & vi-fastpass Downgraded Feature In vMA 4.1 (Virtually Ghetto)
ESXi 4.1 – Major Security Issue – The Sequel And The Workaround (DeinosCloud)
vSphere’s Total Lockdown (Everyday Virtualization)
VMware vSphere Hypervisor (ESXi) 4.1 kickstart – A.K.A. official “touchfree” ESXi installs (get-admin)
What’s New in vSphere 4.1 API? (Double Cloud)
vSphere 4.1 and ESXi (Virtualization Practice)
DPM scheduled tasks (Frank Denneman)
VM to Hosts affinity rule (Frank Denneman)
VMware vSphere 4.1 (Virtualised Reality)
vSphere 4.1 – Batteries (Client) Not Included in ESX/ESXi (Jase’s Place)
vSphere 4.1 Hidden Gem: Host Affinity Rules (Latoga Labs)
USB passthrough in vSphere 4.1 (vStorage)
VMware vSphere 4.1 Storage IO Control (SIOC) understanding (GeekSilver’s Blog)

News articles:

VMware Introduces Enhanced Virtualization Offerings for Small and Midsize Businesses (VMware news release)
VMware Advances Foundation for Cloud Computing With VMware vSphere 4.1 and Expanded Virtualization Management Portfolio (VMware news release)
VMware throws bone to enterprises, SMBs with vSphere 4.1 (SearchServerVirtualization)
VMware adopts per-VM licensing, pricing (SearchServerVirtualization)
First look: VMware vSphere 4.1 keeps the virtualization crown (Network World)
Will vSphere 4.1 help VMware compete with Microsoft, Citrix for SMB users? (Infoworld)
VMware scales up vSphere virt, rejigs prices (The Register)
VMware to change the vSphere architecture significantly (Virtualization.info)
Release: VMware vSphere 4.1 (Virtualization.info)
vSphere 4.1 Flexes Muscles, Trims Costs (Virtualization Review)
Why small businesses should care about VMware vSphere 4.1 (PC Pro)

Downloads:

Main Download Page
ESX 4.1
ESXi 4.1
vCenter Server 4.1
vSphere Hypervisor (Free ESXi)
vSphere Management Assistant (vMA) 4.1

vSphere CLI 4.1
vSphere PowerCLI 4.1
Cisco Nexus 1000 AV1 Virtual Ethernet Module

Documentation:

Main and Documentation sets:

Main documentation link
Download the complete ESXi 4.1 Embedded and vCenter Server 4.1 Documentation Set
Download the complete ESXi 4.1 Installable and vCenter Server 4.1 Documentation Set
Download the complete ESX 4.1 and vCenter Server 4.1 Documentation Set

Individual Docs:

Documentation Roadmap
Configuration Maximums for VMware vSphere 4.1
VMware vSphere Compatibility Matrixes
Introduction to VMware vSphere
Getting Started with ESX
ESX and vCenter Server Installation Guide
Upgrade Guide
Datacenter Administration Guide
Virtual Machine Administration Guide
vSphere Web Access Administrator’s Guide
ESX Configuration Guide
Resource Management Guide
Availability Guide
Fibre Channel SAN Configuration Guide
iSCSI SAN Configuration Guide

ESXi:

Getting Started with ESXi Installable
Getting Started with ESXi Embedded
ESXi Installable and vCenter Server Setup Guide
ESXi Embedded and vCenter Server Setup Guide
ESXi Configuration Guide

Upgrade:

Upgrading to ESX 4.1 and vCenter Server 4.1 best practices (1022104)
Upgrading ESX 4.0 to ESX 4.1 (1022140)
vSphere 4.1 upgrade pre-installation requirements and considerations (1022137)
Performing an offline upgrade from ESX 3.x to ESX 4.x (1009440)
How to: Upgrade to vSphere 4.1 (VMGuru.nl)
ESX host upgrade to 4.1 using esxupdate (vReality)
Upgrade ESXi4.0 to ESXi4.1 – The Unofficial Method (DeinosCloud)
Upgrading ESXi 3.x/4.0 to 4.1 – “Failed to read the upgrade package metadata.xml” (A. Mikkelsen)

Install:

Installing ESX 4.1 and vCenter Server 4.1 best practices (1022101)
Troubleshooting ESXi 4.1 Scripted Install errors (1022308)

KB Articles:

VMware ESX and ESXi 4.1 Comparison (1023990)
Changes to DRS in vSphere 4.1 (1022842)
Changes to VMware High Availability in vSphere 4.1 (1022843)
Changes to VMware Support Options in vSphere 4.1 (1023118)
Changes to vMotion in vSphere 4.1 (1022851)
Changes to Fault Tolerance in vSphere 4.1 (1022844)
vStorage APIs for Array Integration FAQ (1021976)
Overview of Active Directory integration in ESX 4.1 and ESXi 4.1 (1021970)
Improvements in handling thin provisioned devices (1021272)
ESX 4.1 and ESXi 4.1 root passwords are authenticated up to only 8 characters (1024500)
vCenter Server 4.1 fails to install or upgrade with the error: This installation package is not supported by this processor type (1019144)
Powering on virtual machines fails with the error: MAX VCPUs limit is reached (1020121)
Using Tech Support Mode in ESXi 4.1 (1017910)
USB support for ESX/ESXi 4.1 (1022290)
I/O Statistics in vSphere 4.1 (1021953)
Lockdown mode configuration after upgrading from ESXi 4.0 to 4.1 (1021935)
vSphere 4.1 upgrade pre-installation requirements and considerations (1022137)
Load Based Teaming in vSphere 4.1 (1022590)
Migrating to the vCenter Server 4.1 database (1021635)
Update Manager 4.1 patch repository features (1021695)
Upgrading to ESX 4.1 and vCenter Server 4.1 best practices (1022104)
Upgrading ESX 4.0 to ESX 4.1 (1022140)
Using vShieldZones 1.0 with ESX 4.1 (1022536)
Deploying ESXi 4.1 using the Scripted Install feature (1022263)
Network I/O Resource Management in vSphere 4.1 with vDS (1022585)
Changing the number of virtual CPUs per virtual socket in ESX/ESXi 4.1 (1022289)
Troubleshooting ESXi 4.1 Scripted Install errors (1022308)
Troubleshooting Storage I/O Control (1022091)
Installing ESX 4.1 and vCenter Server 4.1 best practices (1022101)
vCenter Server 4.1 network port requirements (1022256)
Configuring IPv6 with ESX and ESXi 4.1 (1021769)
Recreate vSphere 4.0 lockdown mode behavior in vSphere 4.1 (1017628)
Securing Credentials in vMA 4.1 (1017669)
Accessing USB storage and other USB devices from the service console (1023976)

Share This:

Tidbits on the new vSphere 4.1 release

I’ve been in the Beta for 4.1 for quite some time and also have participated in VMware’s blogger briefings on vSphere 4.1. The major features of 4.1 will no doubt be covered by many, this post is simply a collection of tidbits on vSphere 4.1 that I’ve picked up over the last few months. Keep checking back as this post is a work in progress and will grow as I add more to it.

  • vCenter Server 4.1 now requires a 64-bit Windows operating system, it will not installl on a 32-bit Windows OS.
  • This is the last major release to support ESX and the Service Console, ESXi will be the only choice in the next major release due out next year. Almost all vendors now support using APIs instead of Service Console agents.
  • The Host Update utility that installed with the vSphere Client is now gone in 4.1. You’ll notice that the size of the vSphere Client download is much smaller in vSphere 4.1 as a result. To patch ESXi hosts you need to either use Update Manager or the CLI utilities.
  • The vSphere Client is no longer bundled with ESX & ESXi installations, this was done to reduce the build size so the ISO file that is used to install ESX & ESXi with is smaller. In previous versions when you access the web interface of an ESX or ESXi host you had the option to download the vSphere Client directly from the host to install it on a workstation. Having the vSphere Client available as a download from the host was more for convenience. It can still be downloaded from VMware’s website or from the vCenter Server’s web interface. Doing this reduced the size of the ESX ISO from 814MB (4.0) to 631MB (4.1) and reduced the size of the ESXi ISO from 353MB (4.0) to 290MB (4.1).
  • When installing vCenter Server you can now choose the JVM maximum memory size for the Tomcat application server that is installed on the vCenter Server. This can drastically reduce or increase the amount of RAM that the JVM uses which is the biggest memory consumer on the vCenter Server. For small (<100 hosts) the JVM is set to 1024MB, medium (100 – 400 hosts) the JVM is set to 2048MB and for large (>400 hosts) the JVM is set to 4096MB. This setting can be changed at anytime by loading the Configure Tomcat utility in the VMware start menu folder and selecting the Java tab.
  • Application Monitoring is a new feature of HA which will monitor applications that have been modified to transmit a heartbeat that vSphere can detect and restart a VM if the application stops responding (crashes). This adds another layer of the stack that HA can monitor uptime for (Host, Operating system, Application), currently no applications support this but will there will probably be some in the future.
  • Name/case changes:
    • VMotion -> vMotion
    • Storage VMotion -> Storage vMotion
    • ESXi free or standalone edition -> vSphere Hypervisor
    • ESX & ESXi paid editions -> Hypervisor Architectures
  • The VMFS disk format has been upgraded from version 3.33 (vSphere 4.0) to version 3.46 (vSphere 4.1), like some prior updates this one is minor and not worth re-creating your VMFS volumes for. The new VMFS driver (not the disk format) in vSphere 4.1  includes new storage offloading algorithms which are introduced in vSphere 4.1 via VAAI (vStorage APIs for Array Integration).
  • A new feature in the Performance views will show you VM/host power usage in Watts. ESX 4.1 can gather host power consumption on platforms which provide that data through IPMI sensors. Newer platforms from HP, Dell, IBM, and Fujitsu are supported, and there is a way to teach ESX on how to get host power consumption on other systems which have host power consumption IPMI sensors. If you go to vClient and click on “Performance” and then choose “Power” from the drop down list at the top, then you should see host power consumption chart if the host is supported. However this feature will not work by default and is considered experimental. To enable it click on the Configuation Tab on an ESX Host, in the Software box, click Advanced Settings. In the list of options click on Power and scroll down to near the end of the list on the right hand side and you will see a setting called Power.ChargeVMs , change this value to 1 and click OK.  This is one more step to make this work, you need to edit the /usr/share/sensors/vmware file and add information for your server, by default there is an example of a Fujitsu server showing the syntax that should be used when describing sensors. VMware added this functionality so that OEMs and customers can add support for their systems without the need for VMware to update sensord itself. For example for an HP385 G6 servers which has two IPMI sensors called “Power Supply 1” and “Power Supply 2”, you can add a single line to the sensor file like this: “default:power:HP:ProLiant DL385 G6:Power Supply 1,Power Supply 2:WATTS” You’ll need to restart sensord on the server afterwards. The names of the sensors put in these configuration files must match the correct vendor sensor name, the vendor and product names can be anything you want. VMware plans on having OEMs produce their own configuration files for sensord and either send them to VMware or ship them as part of their oem.tgz custom archives.
  • Other new advanced power settings include:
    • Power.UsePStates
    • Power.UseCStates
    • Power.UseStallCtr
    • Power.CStateMaxLatency
    • Power.CStateResidencyCoef
    • Power.CStatePredictionCoef
    • Power.PerfBias
    • Power.PerfBiasEnable
    • Power.ChargeVMs
    • Power.ChargeMemoryPct
  • These settings control what the Custom power policy does. By default Custom is the same as Balanced, but you can tweak those settings to change it. For example, in 4.1, the Balanced policy doesn’t use C-states (only P-states), while the Low policy uses both but also changes some other parameters to be more aggressive. You could make a Custom policy that is the same as Balanced except that C-states are used. Each option has a doc string that briefly explains what it does, which should be available in the UI. If the doc string starts “In Custom policy”, that option affects only the Custom policy. Otherwise it’s applied regardless of policy. There is not a lot of documentation on these settings as VMware anticipated practically no one would actually want to play with a custom policy or tweak the other options; they’d just choose from one the three predefined ones (High Performance, Balanced, or Low Power).
  • The difference between a processor C-state and a P-state is this:
    • A P-state can alter the frequency and voltage of a CPU core from a low state (P-min) to the max state (P-max), this can help save power for workloads that do not require a CPU core full frequency.
    • A C-state shuts down a whole CPU core so it cannot be used, this is done during periods of low-activity and saves more power than simply lowering the CPU core frequency.
  • A new feature in vSphere 4.1 call iSCSI Boot Firmware Table (iBFT) allows booting from an iSCSI target using software initiators. Previously only hardware initiators on ESX supported this feature. This feature has some restrictions though; it will only work ESXi (no ESX) and the only currently supported network card is the Broadcom 57711 10GBe NIC. When booting from software iSCSI the boot firmware on the network adapter logs into an iSCSI target. The firmware than saves the network and iSCSI boot parameters in the iBFT which is stored in the host’s memory. Before you can use iBFT you need to configure the boot order in your server’s BIOS so the iBFT NIC is first before all other devices. You than need to configure the iSCSI configuration and CHAP authentication in the BIOS of the NIC before you can use it to boot ESXi from. The ESXi installation media has special iSCSI initialization scripts that use iBFT to connect to the iSCSI target and present it to the BIOS. Once you select the iSCSI target as your boot device the installer copies the boot image to it. Once the media is removed and the host rebooted the iSCSI target is used to boot and the initialization script runs in first boot mode which configures the networking which afterwards is persistent.
  • Memory Compression is a new feature to version 4.1 of vSphere than can offer VMs performance benefits. It provides a mechanism for swapping out memory which is between that of physical memory and disk, and works when a VM’s memory is under contention. The performance gains are had by the memory not being swapped out to slower disk based storage.
  • Load-based teaming found in vSphere 4.1 provides the ability to dynamically adjust the teaming algorithm which will balance the network load across a team of physical adapters connected to a vNetwork Distributed Switch.
  • A new feature with vSphere 4.1 is the extra storage performance and NFS statistics that can be accessed via the performance charts and esxtop. These metrics provide a useful insight into storage throughput and any host or virtual machine (VM) latency.
  • You will receive a prompt when creating a Distributed vSwitch to choose a vDS version, either 4.0 or 4.1, if your hosts are all 4.1 you can choose the 4.1 version which enables additional features such as Network I/O control and dynamic load balancing.
  • vSphere 4.1 added another new feature to HA that checks the Operational Status of the cluster. Available on the cluster summary tab, this detail window called Cluster Operational Status displays more information about the current HA operational status, including the specific status and errors for each host in the HA cluster.
  • vStorage APIs for Data Protection (VADP)  now offer VSS quiescing support for Windows 2008 and Windows 2008 R2 servers. This enables application-consistent backup and restore operations for Windows 2008 and Windows 2008 R2 applications.
  • VMware multi-core virtual CPU support lets you control the number of cores per virtual CPU in a virtual machine. This capability lets operating systems with socket restrictions use more of the host CPU’s cores, which increases overall performance. You can configure how the virtual CPUs are assigned in terms of sockets and cores. For example, you can
    configure a virtual machine with four virtual CPUs in the following ways:

    • Four sockets with one core per socket
    • Two sockets with two cores per socket
    • One socket with four cores per socket
  • Using multi-core virtual CPUs can be useful when you run operating systems or applications that can take advantage of only a limited number of CPU sockets. Previously, each virtual CPU was, by default, assigned to a single-core socket, so that the virtual machine would have as many sockets as virtual CPUs. When you configure multicore virtual CPUs for a virtual machine, CPU hot Add/remove is disabled. TO set this in the vSphere Client inventory, right-click the virtual machine and select Edit Settings. Select the Hardware tab and select CPUs and select the number of virtual processors. 4 Select the Options tab and Click General in the Advanced options list, click Configuration Parameters, click Add Row and type cpuid.coresPerSocket in the Name column. Type a value [2, 4, or 8] in the Value column. The number of virtual CPUs must be divisible by the number of cores per socket. The coresPerSocket setting must be a power of two. Click OK and power on the virtual machine. You can verify the CPU settings for the virtual machine on the Resource Allocation tab.
Share This:

New book – Maximum vSphere

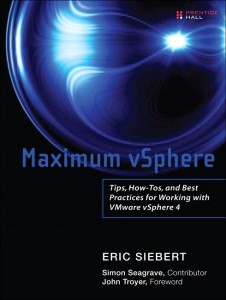
After writing my first book I swore I’d never write another, it’s a relatively big investment in time with a fairly small financial return. Ask any author and they’d probably say the same thing right after finishing a book. Well fortunately that feeling does not last and the desire to write another eventually returns. I took my time preparing for this one, I didn’t feel comfortable writing about vSphere until I had used it for many months to gain as much knowledge and experience as I could with it first. When I did get started with it I wrote the whole book in about 2 months time. I did have a little help though, I approached Simon Seagrave to see if he would contribute by doing a few chapters. He was very happy to be onboard and ended up doing the chapters on Performance and vSphere Home Labs. It was great working with him and I think the book turned out pretty good. Due to publisher constraints we had to fit everything into 350 pages which was quite challenging and meant we had to trim some fat and eliminate many figures. The end result was a book packed with information on vSphere including information on the not yet released next version. I was lucky to have John Troyer return to do the foreword on this book which is due out right before VMworld. You can find out more about the book on Pearson’s website and it’s also available on Amazon for pre-order. Not only will this book give you great information, it will look cool on your book shelf!

0137044747

Share This:

Please consider voting for my VMworld sessions

I have 2 sessions in consideration for VMworld 2010 in the Virtualization 101 track. The first is a deep-dive session on vSphere features, I’m the curious type and always have to know how things work behind the scenes. As a result I do a lot of research trying to figure out the technical magic behind features like VMDirectPath, VMCI, Fault Tolerance, DVFS, etc. Once I have a firm understanding of how things work I can better explain it to everyone else so they can understand it as well without having to do all the work I did to find out. The second session is on home labs and small vSphere environments. I’ve had a lot of experience recently with different home lab configurations and done a lot of research on supported configurations, hardware and shared storage options. I’ve gone from building a powerful desktop to use with VMware Workstation and running ESX/ESXi as VMs to using low-cost brand name servers running ESX/ESXi bare metal. For a pretty affordable price I’ve built a pretty cool lab that any VMware admin would enjoy having. So if you’d like to hear more about either topic head on over to the VMworld website and vote for me.

Vote here: http://vmworld.com/community/conferences/2010/cfpvote/v101

Title: Deep Dive on Virtualization – How stuff works in virtualization
Session Id: V18268
Abstract: You may use virtualization everyday but do you really understand how everything works behind the scenes? This session will provide deep dives into the many features of virtualization so you may better understand them and be able to use them more effectively. In this session we will cover things like paravirtualization, hardware virtualization (CPU & chipsets), VMDirectPath, Trusted Platform Module, Dynamic Voltage Frequency Scaling, VMCI, CBT, snapshots, ESXi anatomy, virtual machine anatomy (hardware/files) and more. This session will provide a better understanding of some of the more complex features of vSphere and those that rely on specific server hardware. Attendees will learn the mechanics behind these features with technical deep dives that go beyond the product documentation which only tells you how to use them and not how they work or why you should use them. For those that are curious about how everything works in virtualization this session will give you a much better understanding of the technology so when you go to use a feature you will know exactly what is happening, requirements and the benefits of the feature. In addition the deep dives into the anatomy of ESXi & VM’s will provide you with information that will allow you to more effectively troubleshoot and administer them.
Type: Breakout Session
Track:Virtualization 101
Speaker: Eric Siebert Company: Boston Market
Title: Building an affordable vSphere environment for a lab or small business
Session Id:V18328
Abstract:“This session will cover how to build a vSphere home lab or an environment for use in a small business. It will cover the following areas: 1) How to choose the hardware, including white box hardware, brand name hardware, network components and storage 2) What the hardware compatibility guide means and the consequences of using unsupported hardware 3) Making sure the hardware you choose will work with vSphere 4) Using VMware Workstation to run nested hypervisors and virtual machines 5) Using ESX or ESXi to run nested hypervisors or virtual machines 6) Installing ESXi on to a USB flash drive 7) How to choose and use affordable shared storage devices 8) Using free ESXi and free administration tools to manage it 9) Using the affordable Essentials editions to gain big features at a reduced cost 10) Putting it all together to make a virtual environment”
Type: Breakout Session
Track:Virtualization 101
Speaker: Eric Siebert Company: Boston Market
Share This:

New vSphere security feature that you can’t really use yet

According to the original vSphere feature list there is a new security feature called “VMkernel Protection” that uses a technology called Trusted Platform Module (TPM) to add a layer of protection to the VMkernel. The VMkernel (hypervisor) is the most critical component of a virtual host because if it is compromised the VM’s running on it can easily be compromised. Therefore VMware introduced a new protection mechanism in vSphere to ensure the integrity of the VMkernel both on disk and in memory. Here is how it is described by VMware:

VMkernel Protection – As part of ongoing efforts to protect the hypervisor from common attacks and exploits, mechanisms were introduced to assure the integrity of the VMkernel and loaded modules as they reside on disk and in memory. Disk-integrity techniques protect the boot-up of the hypervisor using the Trusted Platform Module (TPM), a hardware device embedded in servers. To ensure the authenticity and integrity of dynamically loaded code, VMkernel modules are digitally signed and validated during load-time. These disk integrity mechanisms protect against malware, which might attempt to overwrite or modify VMkernel as it persists on disk. VMkernel also uses memory integrity techniques at load-time coupled with microprocessor capabilities to protect itself from common buffer-overflow attacks that are used to exploit running code. These techniques create a stronger barrier of protection around the hypervisor. See the ESX Configuration Guide and the ESXi Configuration Guide.

Having a strong interest in security I was curious about this feature and wanted to try it out so I did some research on it. TPM is a security specification developed by Trusted Computing Group (TCG) that uses cryptographic keys to protect information. It relies on a TPM chip which has a unique RSA key burned into it and is capable of performing platform authentication and can be used to verify that software has not been changed. vSphere can use TPM to digitally sign VMkernel modules and validate them when the host is starting up to protect against malware that might overwrite them. This feature is similar to the Windows File Protection feature that Microsoft has built-in to Windows to prevent critical system files from being modified or overwritten.

TPM is integrated into processors and chipsets so just like every other technology Intel has their version of it and AMD their own. Intel’s is called Trusted Execution Technology (TXT) which has been available for some time and AMD’s is called Secure Execution Mode (AMD has very little information on this) and is not widely available. For TPM to work you must have both a CPU with the necessary processor extensions for TPM and a chipset that supports TPM. TPM uses Platform Configuration Registers (PCRs) that are like containers that can hold 160-bit values in them in the following manner:

  • At boot PCRs are all initialized to a known value (either 0 or -1)
  • An application can then measure things by computing its hash value
  • The resulting measurement is inserted into a PCR, this process is called “extending the PCR”
  • PCRs can be extended multiple times until a final value is calculated
  • Each code segment is measured and validated and control passes from one code segment to the next
  • PCRs represent an accumulated measurement of the history of the executed code beginning with power-up
  • TPM signing keys can be used to sign the values of PCRs
  • The system state can then be verified from the hashes that get stored into the PCRs

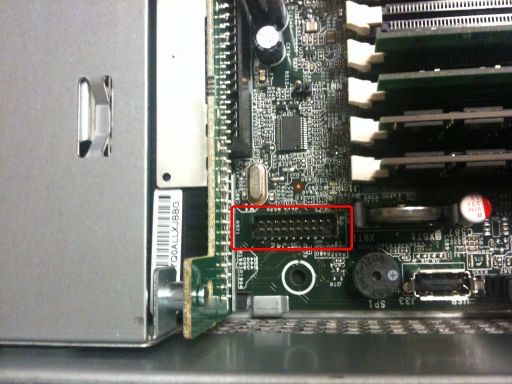
The technology behind TPM is a bit complex and if you wish to read more there are some great resources at the end of this post that you can check out. As I wanted to see this technology in action I ordered a TPM chip for one of our servers so I could try it out. The chips are fairly cheap, for HP servers they are about $39. They consist of a small little circuit board that plugs into a TPM slot located on the motherboard of the server.
tpm4-new1tpm5-new1

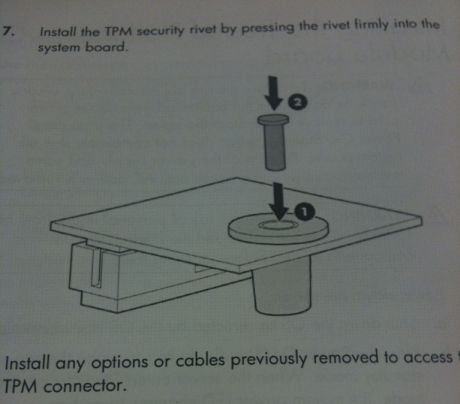
There is also a pin that secures it so if it is ever removed you will know it has been tampered with.
tpm6-new1

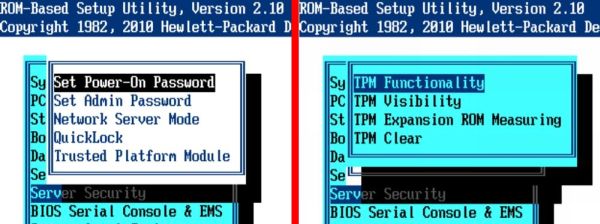
Once the chip is inserted some new security options will appear in the server BIOS to configure the TPM chip as shown below.
tpm3-new1

Once I received the chip and put it in the server I turned to the vSphere documentation to set it up. The problem there was there was no documentation on how to do this despite it being advertised as a new vSphere security feature. The ESXi configuration guide had one little paragraph on TPM which didn’t tell how to set it up and use it:

This module is a hardware element that represents the core of trust for a platform and enables attestation of the boot process, as well as cryptographic key storage and protection. As part of the boot process, ESXi measures the VMkernel by the TPM, and changes to the VMkernel are logged from one boot to the next. Measurement values are propagated to vCenter Server, and can be retrieved by third-party agents using the vSphere API.

Frustrated I reached out to VMware to figure out how to use this feature, some of the information I was able to get is below:

  • TPM is only supported with ESXi.
  • You need a TCG compliant BIOS, TXT needs to be enabled from the BIOS. Once it is enabled, you need to enable use of tboot from the UI Advanced configuration option for the ESXi host (the host has to be added to VC to be able to do this).
  • There are some logs in serial log which can be used to monitor TPM. A 3rd party VC API is provided to fetch the TPM PCRs. If TXT was successful, then VMkernel fingerprint is reported in PCR19 otherwise, if the host has TPM but TXT was not used, then it will show in PCR8, otherwise PCRs should be NULL.
  • There might not be any production server platforms out there ‘today’ which can support TXT.

I never did find the “tboot” advanced parameter that was supposed to be enabled. I checked all through the VMkernel advanced settings and didn’t see anything that was even close. It seems like while TPM provides some additional great protection for the VMkernel it is not yet ready to be used. The building blocks are currently there in vSphere but none of the necessary support features to be able to use it effectively exist yet. For example there is no way to monitor the feature so even if you could enable it there would be not much value to it. I expect both 3rd party vendors and VMware will develop the missing pieces in a future release (note the ESX & ESXi 4.1/4.5 version #’s in the videos) and look forward to being able to fully utilize this new security feature.

Share This:

It’s OK to disagree but please be civil about it

I see it frequently on Twitter, here’s an example:

  • Vendor A – Our product does this and supports this, Vendor B’s does not
  • Vendor B – Oh yeah well our product does this and this and your product doesn’t
  • Vendor A – Your product is way behind ours, you have a lot of catching up to do
  • Vendor B – Then why are so many people using our product, our product is the best

If you’re on Twitter you’ve probably experienced this first hand, you also see it on blogs. Vendors that are rivals frequently bait each other by making claims that there product is better in one way or another. Of course the other vendor can’t resist this challenge and takes the bait and you have a back and forth debate that usually gets nasty and that all of us must experience while each vendor tries to throw punches and claim victory. This kind of non-professional banter has no place in a professional business. Everyone is vulnerable to this, I’ve even seen C-level executives get caught up in this. You may think that you are only defending your company and products when you respond to this kind of stuff but to everyone else that is watching you go back and forth it seems very childish and benefits neither vendor. Because of this kind of behavior you almost have to question who to trust and who to believe, vendor A or vendor B. Some people may choose to trust neither vendor because of the mudslinging and go with vendor C instead.

If you really want to sell your products and impress people try taking the higher ground when challenged by another vendor. Yes we know you are proud of your products as you should be and believe them to be the best but arguing with and insulting other vendors in public forums is not the way to prove it. Instead use your websites or blogs to inform those who are interested why your product is good and why they should buy it. There is a damn big pool of customers out there and plenty of room for multiple vendors to thrive. I do not work for a vendor and I can tell you from my personal experience that seeing that kind of immature behavior makes me not want to deal with that vendor regardless of how good their products are. On the other hand I have a great deal of respect for vendors that take the higher ground and act in a classy manner.

So vendors, knock it off, please act professional and people will notice and more importantly will listen to you. You may not like your competitors but at least respect them, they’re trying to make a living just like you are. Vendors that have mutual respect for their rivals get real high marks in my book and that type of friendly, non-confrontational  interaction between vendors is productive and very beneficial to all. Now I’m not saying you shouldn’t debate your points on social media, I like a good debate and can learn from it as long you keep it civil and professional. Just try and remember that we’re all professionals and try not to get caught up in the heat of the moment and lash out in a insulting or derogative manner at someone who challenges you. The people reading and following you will take notice and you will score higher marks than getting caught up in a Twitter piss-match. Social media is a wonderful tool when used correctly, when used incorrectly though it can really hurt your business. I really enjoy the great information that I gather on social media, so lets keep it civil so everyone enjoys what you have to say.

Share This: