So you have a virtualization blog and for whatever reason you want to move it to a new hosting provider, where do you begin? I recently moved this site from GoDaddy to HostGator as I was fed up with GoDaddy for a number of reasons. I was initially a bit intimidated by the move as it didn’t seem all the straightforward and I didn’t want anything to break. My main concerns were preserving the version of WordPress I was on and all my plug-ins and successfully moving the database. After doing a bunch of research and finding out all I could about how to move everything correctly I found the whole process to be fairly easy and pain-free. I thought I would document what was involved to make the move and the necessary steps in case anyone else has to go through it.
There are 3 main things that need to be moved when migrating a WordPress instance from one hosting provider to another:
- DNS records
- WordPress files
- WordPress database
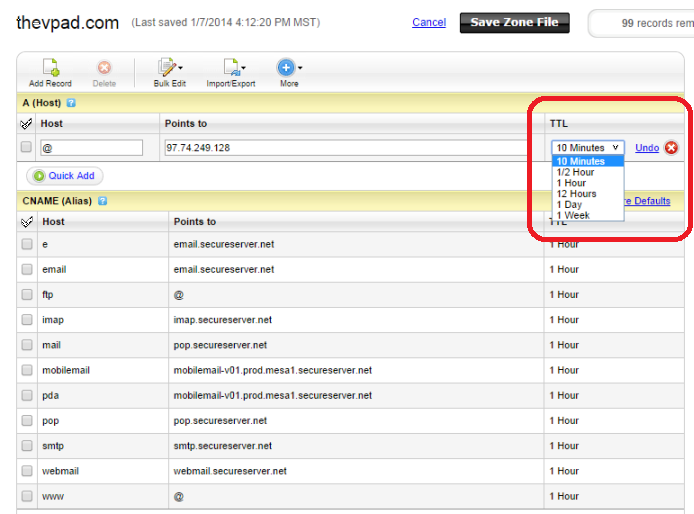
1. Prepare your DNS entry for a quicker cutover
Updating DNS to the IP address of your new hosting server is probably the simplest part and also the last step in the process. However because DNS can take a while to propagate out across the internet, you’ll want to change the Time To Live (TTL) value for your website’s DNS entry at least a day before starting the migration. Doing this ensures that your cutover will be quicker as DNS records will be cached for a shorter amount of time and will be forced to lookup sooner and recognize the IP address change, also if you need to fail back to your old server for any reason that will go quicker as well. Go to your DNS control panel and modify your A record and any applicable CNAME records (i.e. www) to 1 hour or less.
2. Backup all your WordPress files
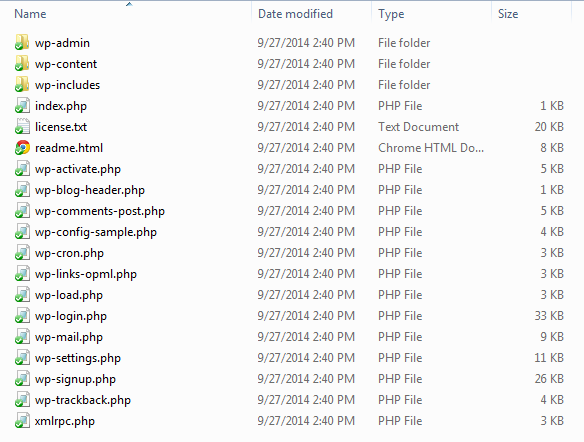
When you install WordPress on your website there are hundreds of files that get copied to specific directories that contain the complete WordPress web application. A new install of WordPress is only about 16MB in size with around 1,100 files but as you add content that will grow. Since we will be moving WordPress from one server to another we will need to copy the appropriate files and directories from the old server to the new server. If you for some reason want to ever install a fresh copy of WordPress you can find all of the versions in the WordPress release archive. Below are the files and directories that are come with a new install of WordPress.
The easiest way to move the files is to use an FTP application to copy them from your old server to your local PC and then to your new server. It’s also a good idea to periodically do this to backup WordPress. If you need a FTP client, check out FileZilla which is a free open source application. You may need to setup a FTP username/password on your hosting site before you can connect to it. Create a new site in FileZilla and give it a name (i.e. mywebsite-old), use the IP address instead of a DNS name to avoid confusion during the cutover and then enter in your login credentials. Once you connect to your web server you’ll see the directory listing of the contents, what you see will usually vary by hosting providers, some providers partition you off so you don’t see much of the web server files. After connecting to my website on GoDaddy here is the content listing:
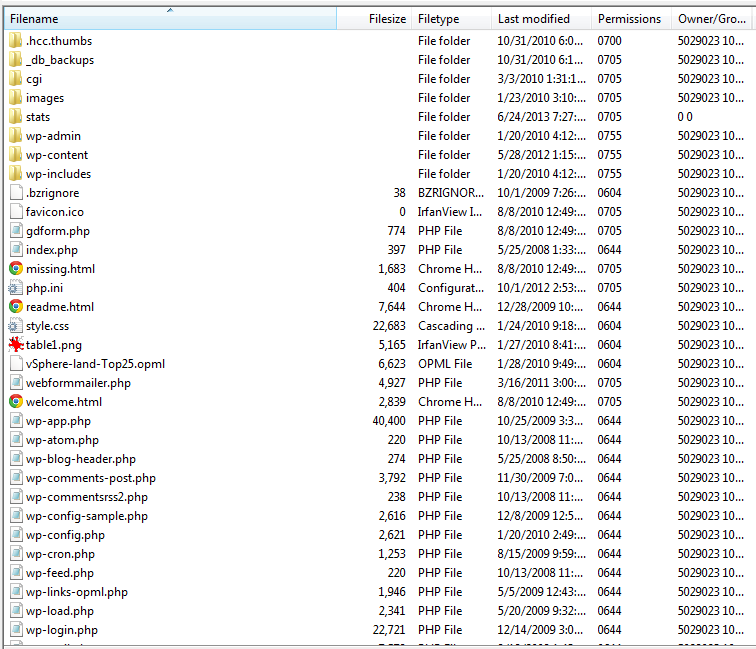
At this point it’s important to not make any changes to your old website, otherwise they will not be copied to your new websitesite. You may not need all the files you see but its best to copy everything to a subdirectory on your PC so you do have a full backup in case you miss anything that you might need later. In the figure above you can see the 3 WordPress directories that you need to copy for sure along with all the files that start with “wp” in the root directory. I’ve manually copied things to my site in the past (i.e. images) which is why you see some extra files and directories which I’ll copy also. Other files that are part of the hosting platform like “cgi”, “stats”, “webformmailer.php” and “_db_backups” I don’t need to bring over. Once you’ve copied everything to your PC it’s time to move on to the next step, copying your database.
3. Backup your database
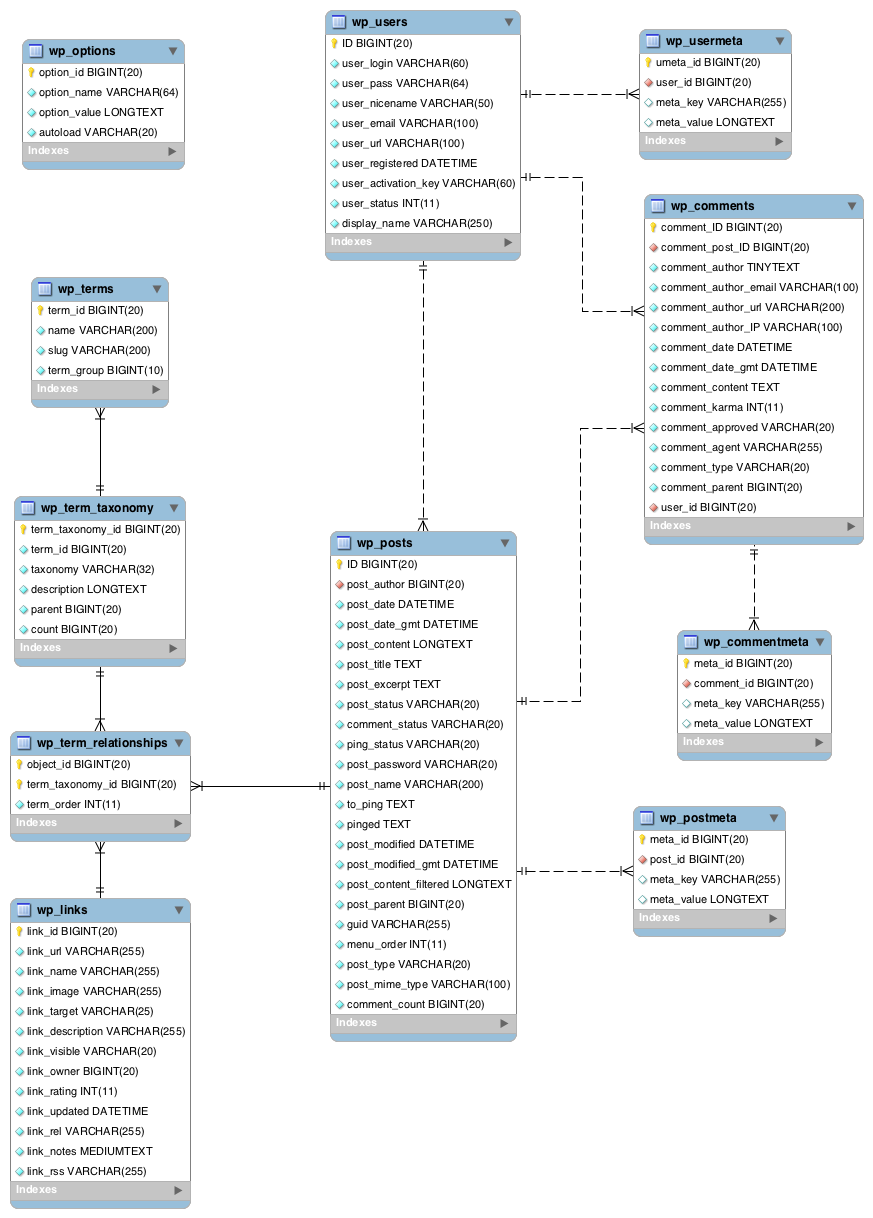
Your WordPress database is typically hosted on a MySQL database that is installed and managed by your hosting provider. The WordPress database has many tables that store configuration and content for your WordPress website. You can see what a typical WordPress database structure looks like below, you can find a complete description of the database tables here:
Most hosting providers provide database management tools so you can manage and perform database operations. Don’t be intimidated by this as what we are doing to back it up is fairly simple and you don’t need to be a DBA to do it. Log into your hosting provider control panel for your website and you should see a link for database management via phpMyAdmin which is a free software tool that is written in PHP that is used to administer MySQL over the Web. Here’s how you launch it on GoDaddy in your website control panel:
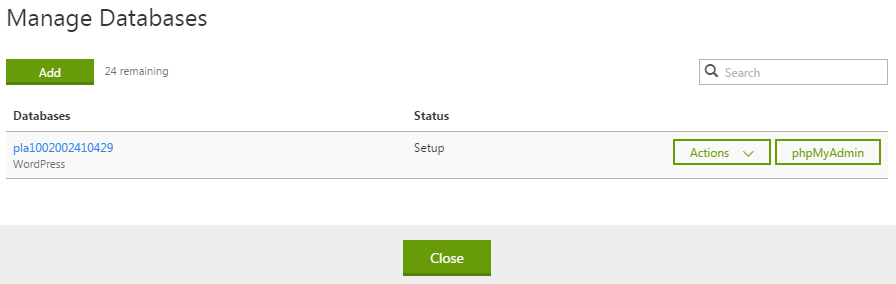 Note the database name which is usually a mix of letter and numbers, launch phpMyAdmin and you should be prompted for a username and password to connect to your database.

You probably won’t know it or remember it but no worries as you can easily look it up by opening the wpconfig.php file that you copied to your PC as part of the backup in a text editor like Notepad and look for the MySQL section like below:
[important]// ** MySQL settings – You can get this info from your web host ** //
/** The name of the database for WordPress */
define(‘DB_NAME’, ‘pla1002002410429’);
/** MySQL database username */
define(‘DB_USER’, ‘pla1002002410429’);
/** MySQL database password */
define(‘DB_PASSWORD’, ‘Admin1234’);
/** MySQL hostname */
define(‘DB_HOST’, ‘pla1002002410429.db.5029023.hostedresource.com’); [/important]
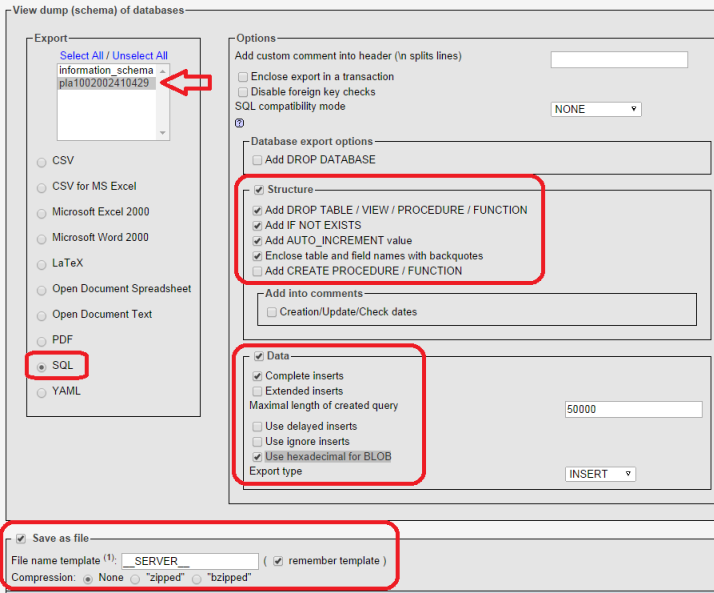
Note my username was the same as the database name, now that you have the username and password you can login to phpMyAdmin with it. Note some hosting providers may require you to whitelist your IP address to do remote MySQL administration, if they do there should be a section in your hosting control panel to put in your IP address. Once you are logged into phpMyAdmin you want to Export your database, click the Export link as shown below:

On the Export options screen do the following (note your options may be slightly different):
Export section
- Select your database, you should only be selecting one, do not select all as you do not need others like information_schema
- Make sure SQL format is selected
Options – Structure section
- Make sure Structure is selected
- Select Add DROP TABLE / VIEW / PROCEDURE / FUNCTION
- Select Add IF NOT EXISTS
- Select Add AUTO_INCREMENT value
- Select Enclose table and field names with backquotes
Options – Data section
- Make sure Data is selected
- Complete inserts
- Use hexadecimal for BLOB
Save as file section
- Select Save as file
- Select Compression to None
When you have done as this it should look similar to below, hit Go and it will ask you for a location for the file on your PC and then begin the Export. It shouldn’t take more than a few minutes.
Once you have completed this you have everything you need to move your WordPress site to a new hosting provider. Part 2 will cover how to copy your WordPress files to your new web server and import your database and get it all up and running.