Tag: vSphere

Best Practices for running vSphere on iSCSI

VMware recently updated a paper that covers Best Practices for running vSphere on iSCSI storage. This paper is similar in nature to the Best Practices for running vSphere on NFS paper that was updated not too long ago. VMware has tried to involve their storage partners in these papers and reached out to NetApp & EMC to gather their best practices to include in the NFS paper. They did something similar with the iSCSI paper by reaching out to HP and Dell who have strong iSCSI storage products. As a result you’ll see my name and Jason Boche’s in the credits of the paper but the reality is I didn’t contribute much to it besides hooking VMware up with some technical experts at HP.

So if you’re using iSCSI be sure and give it a read, if you’re using NFS be sure and give that one a read and don’t forget to read VMware’s vSphere storage documentation that is specific to each product release.

capture7

Share This:

The Top 10 Things You MUST Know About Storage for vSphere

If you’re going to VMworld this year be sure and check out my session STO5545 – The Top 10 Things You MUST Know About Storage for vSphere which will be on Tuesday, Aug. 27th from 5:00-6:00 pm. The session was showing full last week but they must have moved it to a larger room as it is currently showing 89 seats available. This session is crammed full of storage tips, best practices, design considerations and lots of other information related to storage. So sign up know before it fills up again and I look forward to seeing you there!

top10-11

Share This:

The new HP ProLiant MicroServer Gen8 – a great virtualization home lab server

I’ve always liked the small size of the HP MicroServer which makes it perfect for use in a virtualization home lab, but one area that I felt it was lacking was with the CPU. The original MicroServer came with a AMD Athlon II NEO N36L 1.3 Ghz dual-core processor which was pretty weak to use with virtualization and was more suited for small ultra-notebook PC’s that require small form factors and low power consumption. HP came out with enhanced N40L model a bit later but it was just a small bump up to the AMD Turion II Neo N40L/1.5GHz and later on to the N54L/2.2 Ghz dual-core processor. I have both the N36L & N40L MicroServers in my home lab and really like them except for the under-powered CPU.

Well HP just announced a new MicroServer model that they are calling Gen8 which is in line with their current Proliant server model generation 8. The new model not only looks way cool, it also comes in 2 different CPU configurations which give it a big boost in CPU power. Unfortunately while the GHz of the CPU makes a big jump, it’s still only available in dual-core. The two new processor options are:

Having a Pentium processor is a big jump over the Celeron and it comes with more L3 cache. Unfortunately though neither processor supports hyper-threading which would show as more cores to a vSphere host. Despite this its still a nice bump that makes the MicroServer even better for a virtualization home lab server. Note they switched from AMD to Intel processors with the Gen 8 models.

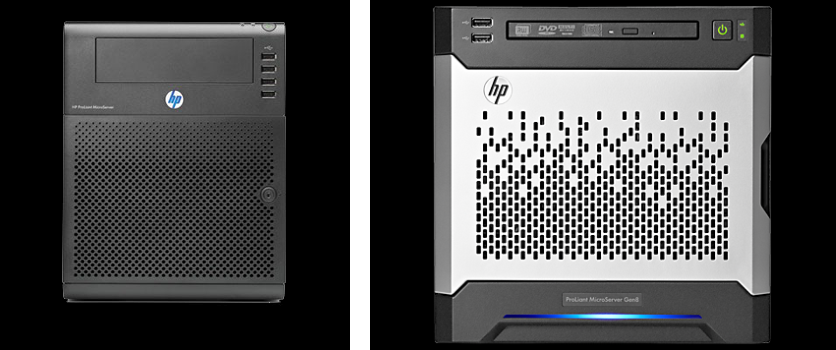
Lets start with a the cosmetic stuff on the new MicroServer, it has a radical new look (shown on the right below) which is consistent with it’s big brother Proliant servers, I personally think it looks pretty bad-ass cool.

2micros

Note the new slim DVD drive  opening on the Gen8 instead of the full size opening on the previous model. One thing to note is that while the new new Gen8 models are all depicted with a DVD drive, it does not come standard and must be purchased separately and installed. The Gen8 model is also a bit shorter and less deep and slightly wider than the old model. On the old model the HP logo would light up blue when powered on to serve as the health light and it looks like on the new model there is a blue bar at the bottom that lights up instead. There are also only 2 USB ports on the front now instead of 4. The old model also had keys (which I always misplace) to open the front to gain access to the drives and components, it looks like on the new model they did away with that and have a little handle to open it. On the back side they have moved the power supply and fan up a bit, removed one of the PCIe ports (only 1 now), removed the eSATA port, added 2 USB ports (2 of them 3.0) and added a 1GB NIC port. This is a nice change especially the addition of the second NIC which makes for more vSwitch options with vSphere. I have always added a 2-port NIC to my MicroServers as they only had 1 previously so it’s nice that it comes with 2.

Inside the unit still has 4 non-hot plug drive trays and supports up to 12TB of SATA disk (4 x 3TB). The storage controller is the HP Dynamic Smart Array B120i Controller which only supports RAID levels 0, 1 and 10. Also only 2 of the bays support 6.0Gb/s SATA drives, the other 2 support 3.0Gb/s SATA drives. There are still only 2 memory slots that support a maximum of 16GB (DDR3), this is another big enhancement as the previous model only supported 8GB maximum memory which limited it to how many VMs you could run on it. The Gen8 model also comes with a new internal microSD slot so you could boot ESXi from it if you wanted to, both the old & new still have an internal USB port as well. The server comes with the HP iLO Management Engine which is standard on all Proliant servers and is accessed through one of the NICs that does split-duty, but you have to license it to use many of the advanced features like the remote console. To license it costs a minimum of $129 for the iLO Essentials with 1 yr support which is a bit much for a home lab server that is under $500.

Speaking of cost  which has always made the MicroServer attractive for home labs, the G1610T model starts at $449 and the G2020T starts at $529, the two models are identical besides the processor and they both come standard with 2GB of memory and no hard drives. I wish they would not include memory in it and make it optional as well and lower the price. If you want to go to 8G or 16Gb of memory (who doesn’t) you have to take out the 2GB DIMM that comes with it and toss it and put in 4GB or 8GB DIMMs. Here are some of the add-on options and pricing on the HP SMB Store website:

  • HP 8GB (1x8GB) Dual Rank x8 PC3- 12800E (DDR3-1600) Unbuffered CAS-11 Memory Kit  [Add $139.00]
  • HP 4GB (1x4GB) Dual Rank x8 PC3-12800E (DDR3-1600) Unbuffered CAS-11 Memory Kit  [Add $75.00]
  • HP 500GB 6G Non-Hot Plug 3.5 SATA 7200rpm MDL Hard Drive  [Add $239.00]
  • HP 1TB 6G Non-Hot Plug 3.5 SATA 7200rpm MDL Hard Drive  [Add $269.00]
  • HP 2TB 6G Non-Hot Plug 3.5 SATA 7200rpm MDL Hard Drive  [Add $459.00]
  • HP 3TB 6G Non-Hot Plug 3.5 SATA 7200rpm MDL Hard Drive  [Add $615.00]
  • HP SATA DVD-RW drive [Add $129.00]
  • HP NC112T PCI Express Gigabit Server Adapter [Add $59.00]
  • HP 4GB microSD [Add $79.00]
  • HP 32GB microSD [Add $219.00]
  • HP iLO Essentials including 1yr 24×7 support [$129.00]

With all the add-ons the server cost can quickly grow to over $1000, not ideal for a home lab server. I’d recommend heading to New Egg & Micro Center and getting parts to upgrade the server. You can get a Kingston HyperX Blu 8GB DDR3-1600 Memory Kit for $69 or a Kingston HyperX Red 16GB DDR3-1600 Memory Kit for $119.00 which is half the cost.

All in all I really like the improvements they have made with the new model and it makes an ideal virtualization home lab server that you are typically building on a tight budget. HP if you want to send me one I’d love to do a full review on it. Listed below are some links for more information and a comparison of the old MicroServer G7 N54L and the new Gen8 G2020T model so you can see the differences and what has changed.

Comparison of the old MicroServer G7 N54L and the new Gen8 G2020T model:

FeatureOld MicroServer G7 (N54L)New MicroServer Gen8 (G2020T)
ProcessorAMD Turion II Model Neo N54L (2.20 GHz, 15W, 2MB)Intel Pentium G2020T (2.5GHz/2-core/3MB/35W)
Cache2x 1MB Level 2 cache3MB (1 x 3MB) L3 Cache
ChipsetAMD RS785E/SB820MIntel C204 Chipset
Memory2 slots - 8GB max - DDR3 1333MHz2 slots - 16GB max - DDR3 1600MHz/1333MHz
NetworkHP Ethernet 1Gb 1-port NC107i AdapterHP Ethernet 1Gb 2-port 332i Adapter
Expansion Slot2 - PCIe 2.0 x16 & x1 Low Profile1 - PCIe 2.0 x16 Low Profile
Storage ControllerIntegrated SATA controller with embedded RAID (0, 1)HP Dynamic Smart Array B120i Controller (RAID 0, 1, 10)
Storage Capacity (Internal)8.0TB (4 x 2TB) SATA12.0TB (4 x 3TB) SATA
Power SupplyOne (1) 150 Watts Non-Hot PlugOne (1) 150 Watts Non-Hot Plug
USB ports2.0 Ports - 2 rear, 4 front panel, 1 internal2.0 Ports - 2 front, 2 rear, 1 internal) 3.0 Ports - 2 rear
microSDNoneOne - internal
Dimensions (H x W x D) 10.5 x 8.3 x 10.2 in9.15 x 9.05 x 9.65 in
Weight (Min/Max)13.18 lb/21.16 lb15.13 lb/21.60 lb
Acoustic Noise24.4 dBA (Fully Loaded/Operating)21.0 dBA (Fully Loaded/Operating)

Share This:

New free tool – HP Virtualization Performance Viewer

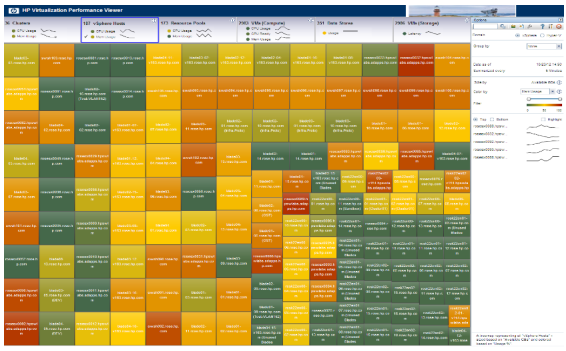
This new free tool caught my eye when it was mentioned on an internal email chain, it’s called the HP Virtualization Performance Viewer (vPV). It’s a lightweight tool that provides real-time performance analysis reporting for to help diagnose and triage performance problems. It’s a Linux based utility and can be installed natively on any VM/PC running Linux or it can be deployed as a virtual appliance. It supports both VMware vSphere & Microsoft Hyper-V environments and has the following features:

  • Quick time to value
  • Intuitive at-a-glance dashboards
  • Triage virtualization performance issues in real-time
  • Foresee capacity issues and identify under / over utilized systems
  • Operational and status report for performance, up-time and distribution analysis

The free version of vPV has some limitations, to achieve the full functionality you need to upgrade to the Enterprise version but the free version should be good enough for smaller environments.

hpv2

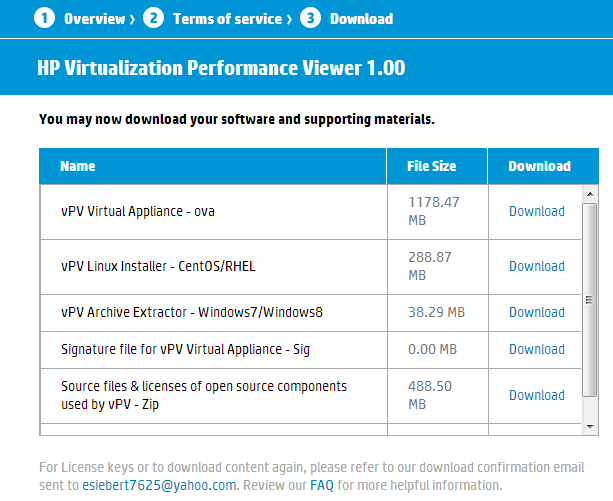
It’s simple and easy to download the tool, just head over to the HP website, enter some basic information and you get the download page where you can choose the files that you want to download based on your install preference.

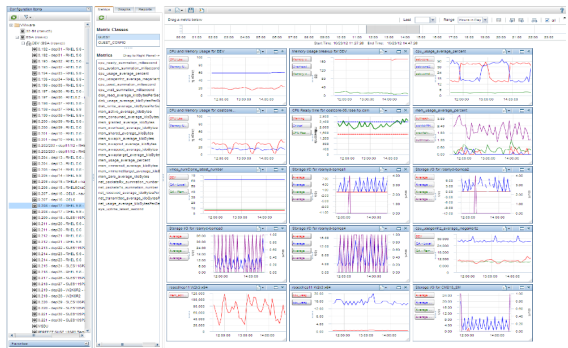
hpv11Downloading the OVA file to install the virtual appliance is the easiest way to go, once you download it, you simply deploy it using the Deploy OVF Template option in the vSphere Client and it will install as a new VM. Once deployed and powered on you can log in to the VM’s OS using the username root and password vperf*viewer if you need to manually configure an IP address. Otherwise you can connect to the VM and start using vPV using the URL: http://<servername>:8081/PV OR https://<servername>:8444/PV which will bring up the user interface so you can get started. I haven’t tried it out yet as it’s still downloading but here’s some screenshots from the vPV webpage:

hpv3hpv4

I’ll do a more detailed review once I have it up and running but it looks like a pretty handy little tool. For more great free tools be sure and check out my huge free tool gallery that contains links to 100+ free tools for VMware environments.

Share This:

Win a complete vSphere dream lab from Unitrends

Why would you want your own vSphere lab in the first place, if you read my book I have a whole chapter on it (actually Simon did that chapter), here’s why:

  • Exam Study – To provide yourself with an environment where you can easily build a mock production environment to follow examples in any study material you may have and to also confirm to yourself that what you have read in your study material actually works as described in practice.
  • Hands-On Learning – Probably the most common reason for putting together your own virtualization lab is to jump onto the kit, wrestle with it and get your hands dirty – breaking it, fixing it and then breaking it again in the process. This is the preferred method of learning for many though for this you obviously do need the luxury of time. Very few of us in IT have the opportunity or access to the necessary non-production hardware during the working day to spend learning a product. With the financially tough times over recent years attending a training course and the often hefty associated price tag has meant that fewer people have had the luxury of learning from a trained instructor making a lab environment a popular choice.
  • Centralized Home Infrastructure – Perhaps you are running a home office or need a centralized IT environment from which to run your home PCs for things such as centralized monitoring, management of your kid’s internet access or the family file, music and photo repository.
  • Because It’s There (ie: Why Not?) – Some of you, like myself, love to play with new enterprise IT products and technologies, even if it doesn’t have direct application to your personal or work life. A virtualized lab environment provides an excellent platform from which to do this from.

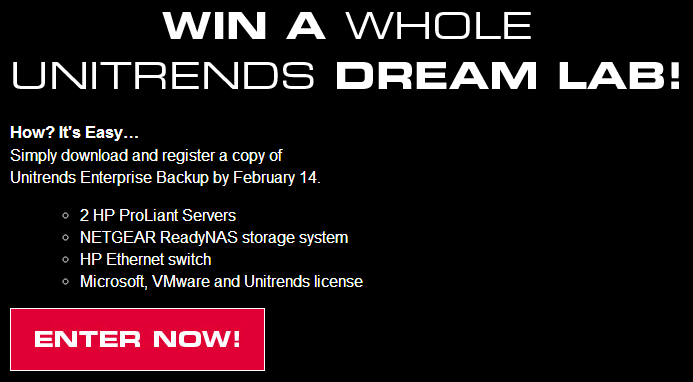
So want your own vSphere lab but maybe are short on funds, no problem, Unitrends has you covered. Unitrends is giving away a complete vSphere dream lab that has all the hardware and software you’ll need to get up and running with vSphere and start cranking out your own VMs. How do you get your chance win this complete vSphere dream lab, it’s pretty simple, just head on over to there website and check out Unitrends Enterprise Backup.

capture4

The vSphere dream lab consists of 2 HP servers, HP network switch, NetGear ReadyNAS and the VMware, Microsoft & Unitrends software you need to get everything up and running. I was able to find out some more detail on the hardware specifications:

  • HP ML110 G7 servers with Xeon quad-core 3.20 GHz CPU’s that support hyper-threading, this will look like 8 CPU cores to vSphere. These are awesome servers, I have two of the ML110 G6 models in my own home lab, they are quiet, powerful and have 4 PCI slots so you can put lots of NICs in them, they’re also expandable to 16GB or memory. They also support all the vSphere advanced features that rely on specific hardware such as power features, Fault Tolerance and VMDirectPath. You can read the Quickspecs on them here.
  • HP V1410-16G Switch, this is a 16-port switch that support gigabit connections, you can read the specs on it here. You’ll need lots of ports if you add more NICs to your servers so you can play around with vSphere networking more, I have 6 NICs in the servers in my lab so I quickly outgrew my 8 port switch.
  • ReadyNAS Pro 2TB Storage system, you can read more about it here. I really like the NetGear NAS units, I have one in my home lab and they are very solid, high quality with lots of features.

unitrends-dream-lab

All in all a nice sweet lab setup, the contest runs from now until Feb. 14th so you have plenty of time to head over there and download and register your copy of Unitrends Enterprise Backup and enter for your chance to win. If if you want to know more about home vSphere labs be sure and check out my massive home labs link collection.

Share This:

Understanding CPU & Memory Management in vSphere

cpumemory

CPU & memory resources are two resources that are not fully understood in vSphere, and they are two resources that are often wasted, as well. In this post we’ll take a look at CPU & memory resources in vSphere to help you better understand them and provide some tips for properly managing them.

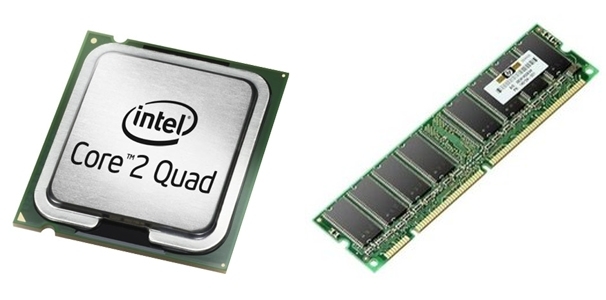
Let’s first take a look at the CPU resource. Virtual machines can be assigned up to 64 virtual CPUs in vSphere 5.1. The amount you can assign to a VM, of course, depends on the total amount a host has available. This number is determined by the number of physical CPUs (sockets), the number of cores that a physical CPU has, and whether hyper-threading technology is supported on the CPU. For example, my ML110G6 server has a single physical CPU that is quad-core, but it also has hyper-threading technology. So, the total CPUs seen by vSphere is 8 (1 x 4 x 2). Unlike memory, where you can assign more virtual RAM to a VM then you have physically in a host, you can’t do this type of over-provisioning with CPU resources.

Most VMs will be fine with one vCPU. Start with one, in most cases, and add more, if needed. The applications and workloads running inside the VM will dictate whether you need additional vCPUs or not. The exception here is if you have an application (i.e. Exchange, transactional database, etc.) that you know will have a heavy workload and need more than one vCPU. One word of advice, though, on changing from a single CPU to multiple CPU’s with Microsoft Windows: previous versions of Windows had separate kernel HAL’s that were used depending on whether the server had a single CPU or multiple CPUs (vSMP). These kernels were optimized for each configuration to improve performance.  So, if you made a change in the hardware once Windows was already installed, you had to change the kernel type inside of Windows, which was a pain in the butt. Microsoft did away with that requirement some time ago with the Windows Server 2008 release, and now there is only one kernel regardless of the number of CPUs that are assigned to a server. You can read more about this change here. So, if you are running an older Windows OS, like Server 2000 or 2003, you still need to change the kernel type if you go from single to multiple CPUs or vice versa.

So, why not just give VMs lots of CPUs, and let them use what they need? CPU usage is not like memory usage, which often utilizes all the memory assigned to it for things like pre-fetching. The real problem with assigning too many vCPUs to a VM is scheduling.  Unlike memory, which is directly allocated to VMs and is not shared (except for TPS), CPU resources are shared and must wait in a line to be scheduled  and processed by the hypervisor which finds a free physical CPU/core to handle each request. Handling VMs with a single vCPU is pretty easy: just find a single open CPU/core and hand it over to the VM. With multiple vCPU’s it becomes more difficult, as you have to find several available CPUs/cores to handle requests. This is called co-scheduling, and throughout the years, VMware has changed how they handle co-scheduling to make it a bit more flexible and relaxed. You can read more about how vSphere handles co-scheduling in this VMware white paper.

When it comes to memory, assigning too much is not a good thing and there are several reasons for that. The first reason is that the OS and applications tend to use all available memory for things like caching that consume extra available memory. All this extra memory usage takes away physical host memory from other VMs. It also makes the hypervisors job of managing memory conservation, via features like TPS and ballooning, more difficult.  Another thing that happens with memory is when you assign memory to a VM and power it on; you are also consuming additional disk space. The hypervisor creates a virtual swap (vswp) file in the home directory of the VM equal in size to the amount of memory assigned to a VM (minus any memory reservations). The reason this happens is to support vSphere’s ability to over-commit memory to VMs and assign them more than a host is physically capable of supporting. Once a host ‘s physical memory is exhausted, it starts uses the vswp files to make up for this resource shortage, which slows down performance and puts more stress on the storage array.

So, if you assign 8GB of memory to a VM, once it is powered on, an 8GB vswp file will be created.  If you have 100 VMs with 8GB of memory each, that’s 800GB of disk space that you lose from your vSphere datastores. This can chew up a lot of disk space, so limiting the amount of memory that you assign to VMs will also limit the size of the vswp files that get created.

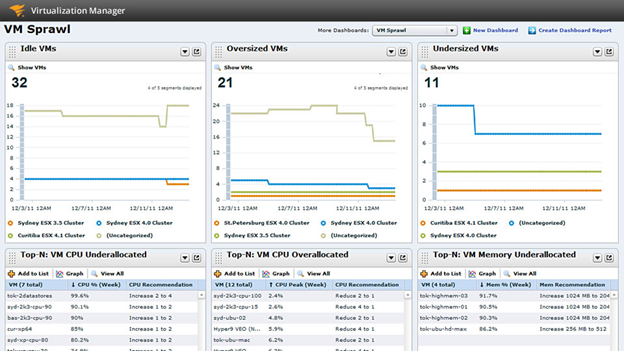
Therefore, the secret to a healthy vSphere environment is to “right-size” VMs.  This means only assigning them the resources they need to support their workloads, and not wasting resources. Virtual environments share resources, so you can’t use mindsets from physical environments where having too much memory or CPUs is no big deal. How do you know what is the right size is? In most cases you won’t know, but you can get a fairly good idea of a VM’s resource requirements by combining the typical amount that the guest OS needs with the resource requirements for the applications that you are running on it. You should start by estimating the amount.  Then the key is to monitor performance to determine what resources a VM is using and what resources it is not using. vCenter Server isn’t really helpful for this as it doesn’t really do reporting. So, using 3rd party tools can make this much easier. I’ve always been impressed by the dashboards that SolarWinds has in their VMware monitoring tool, Virtualization Manager. These dashboards can show you, at a glance, which VMs are under-sized and which are over-sized. Their VM Sprawl dashboard can make it really easy to right-size all the VMs in your environment so you can reallocate resources from VMs that don’t need them to VMs that do.
solarwinds1

Another benefit that Virtualization Manager provides is that you can spot idle and zombie VMs that also suck away resources from your environment and need to be dealt with.

So, effectively managing your CPU and memory resources is really a two-step process. First, don’t go overboard with resources when creating new VMs. Try and be a bit conservative to start out.  Then, monitor your environment continually with a product like SolarWinds Virtualization Manager so you can see the actual VM resource needs. The beauty of virtualization is that it makes it really easy to add or remove resources from a virtual machine. If you want to experience the maximum benefit that virtualization provides and get the most cost savings from it, right-sizing is the key to achieving that.
Share This:

What is SAHF and LAHF and why do I need it to install vSphere 5.1?

Happened to look over the ESXi 5.1 documentation today (yeah, yeah, normally I just install and don’t RTFM) and noticed this in the Hardware Requirements section:

  • ESXi 5.1 will install and run only on servers with 64-bit x86 CPUs
  • ESXi 5.1 requires a host machine with at least two cores
  • ESXi 5.1 supports only LAHF and SAHF CPU instructions
  • ESXi 5.1 requires the NX/XD bit to be enabled for the CPU in the BIOS

Most of the requirements are fairly straightforward, the 64-bit CPU requirement has been there since vSphere 4 was introduced, but many people probably don’t know what NX/XD & LAHF/SAHF are. The NX/XD bit is a CPU feature called Never eXecute, hence the NX name. What the NX bit does is enable the ability to mark certain areas of memory as non-executable with a flag. When this happens the processor will then refuse to execute any code that resides in those areas of memory. Any attempt to execute code from a page that is marked as no execute will result in a memory access violation. This feature adds a layer of security to a computer by providing a protected area against malicious code such as viruses and buffer overflow attacks.

AMD first added the NX bit feature to their AMD64 processor line starting with the Opteron processor starting in 2003. So you may be wondering about the XD part, well that is simply Intel’s name for the same feature which they refer to as eXecute Disable. Intel introduced support for the XD bit shortly after AMD with their Pentium 4 Prescott processor in 2004. Both the NX bit and the XD bit have the exact same functionality just different names so you will often see it as referred to as NX/XD. This feature has been standard on most processors for years now so almost every server built since 2006 should have it. Support for NX/XD is typically enabled or disabled in the server BIOS and is typically found under Processor options and labeled as something like “Execute Disable Bit”, “NX Technology” or “XD Support”.

Many virtualization admins know what NX/XD is but LAHF & SAHF CPU instructions are a processor function that you have probably never heard of. LAHF stands for Load AH from Flags and SAHF stands for Store AH into Flags. LAHF & SAHF are used to load and store instructions for certain status flags. Instructions are basic commands composed of one or more symbols that that are passed to a CPU as input. These instructions related to LAHF & SAHF are used for virtualization and floating-point condition handling. You really don’t need to understand how they work as they are related to the core CPU architecture but if you want to understand them better you can read more about them here.

Support for LAHF and SAHF instructions appeared shortly after NX/XD was introduced. AMD introduced support for the instructions with their Athlon 64, Opteron and Turion 64 revision D processors in March 2005 and Intel introduced support for the instructions with the Pentium 4 G1 stepping in December 2005. So again most most servers built after 2006 should have CPUs that support LAHF/SAHF. Similar to NX/XD which can be enabled or disabled in the server BIOS, support for LAHF/SAHF is typically tied into the Virtualization Technology (VT) option in a server BIOS which is often referred to Intel VT or AMD-V which is their respective support for virtualization CPU technology. The option to enable this on a HP Proliant BIOS is shown below:

bios1

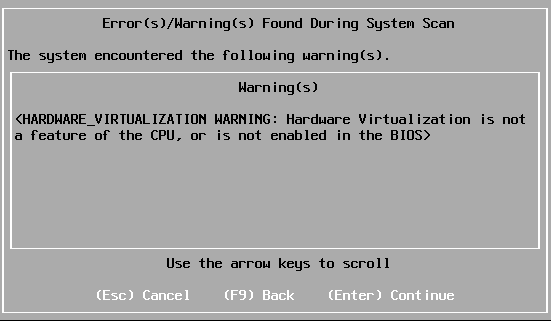
So how do you know if your server’s CPUs support NX/XD & LAHF/SAHF? As I said before if you’ve purchased a server in the last 5 or so years, it most likely will support it. If it doesn’t support it the ESXi installer will warn you when you install it as shown below:

bios31

Interesting enough though it will still let you install it despite not having the required CPU features. Prior versions of vSphere used to give you an error saying your CPU doesn’t support Long Mode and wouldn’t let you install it. If you do get the error above the first thing to check in that case is if you have those options enabled in the BIOS, if you don’t see those options in the BIOS then your CPU may not support them. You can check your specific CPU’s specifications on Intel’s or AMD‘s websites. You can also check VMware’s Hardware Compatibility List but be aware that there are many processor types/server models not on the HCL that will still work despite not being on the list, they just are not officially supported.

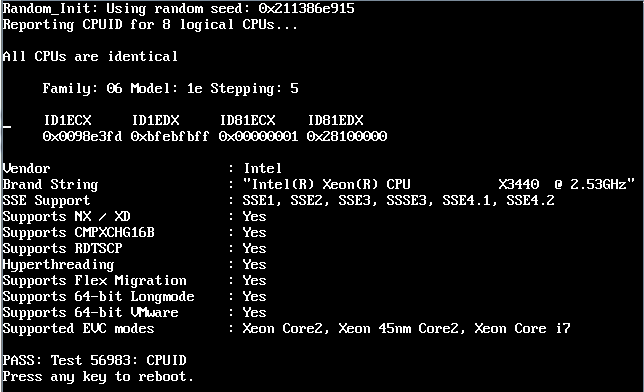
Another way to know if your CPU’s support the required features is to use VMware’s CPU Identification Utility which is a small little ISO that you can boot your host from and it will check the CPU hardware to see if it will support vSphere. I’ve mounted it using the iLO management on server and have also mounted it to a VM’s CD-ROM and booted from it and ran it. Since the CPU hardware is not emulated it can see what type of physical CPU the host is using and what features it supports. The output of the CPU ID tool is shown below, this server fully support all the required CPU features for vSphere:

bios21

So there you have it, now you know more about NX/XD & LAHF/SAHF than you probably wanted to know but at least you have an understanding of what they are when you read about the CPU requirements in the vSphere documentation. You probably won’t find any modern servers that don’t support it but often times our data centers become server graveyards and contain a lot of older hardware that keeps getting re-used until they finally die which may not support it. So knowing what to look for when it comes to CPU features is good to know.

Share This:

VMware configuration maximums from 1.0 to 5.1

VMware has really grown in scalability from the early days of ESX 1.0 with each new release of vSphere. I put together this table on how the configuration maximums have increased over the years so you can see just how much it scales over the years. VMware has published there Configuration Maximums documentation with each release starting with VI3 which you should be familiar with especially if you are trying to get a certification. I pieced together the earlier versions from the installation documentation for each release, there isn’t much info available on ESX 1.0 so if you know anything please fill in the blanks for me. Notice how the VM virtual disk size of 2TB has never changed, this is to due file system limitations that VMware has not yet been able to overcome. With their new Virtual Volumes architecture that limit may finally be gone. Also note on the earlier versions the documentation did not state a 2TB virtual disk limit although I’m almost positive it existed, the documentation stated “9TB per virtual disk”, not sure why though.

Configuration Maximums for VMware ESX/vSphere

VMware release:1.01.52.02.53.03.54.04.15.05.15.56.0
vCPUs per VM112244883264128
RAM per VM2GB3.6GB3.6GB3.6GB16GB64GB255GB255GB1TB1TB4TB
NICs per VM?4444410101010
VM Virtual Disk????2TB2TB2TB2TB2TB2TB62TB
VMFS Volume?64TB64TB64TB64TB64TB64TB64TB64TB64TB
pCPU per host?81616323264160160160320
vCPU per host?648080128128512512204820484096
RAM per host?64GB64GB64GB64GB256GB1TB1TB2TB2TB4TB
pNICs per host?161616323232323232

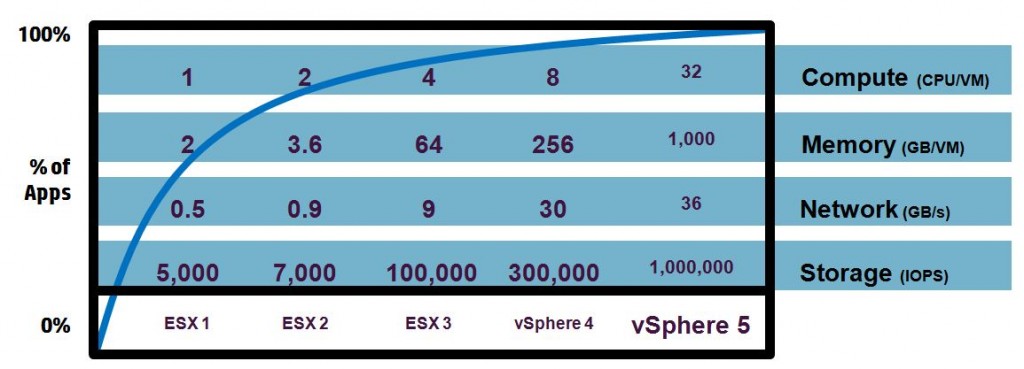
In addition hears a diagram from VMware that depicts the configuration maximums in a slightly different manner:

vsphere-max

VMware Configuration Maximum Published Documents:

Share This: